09 September 2011

The New Millennium Nutmeg

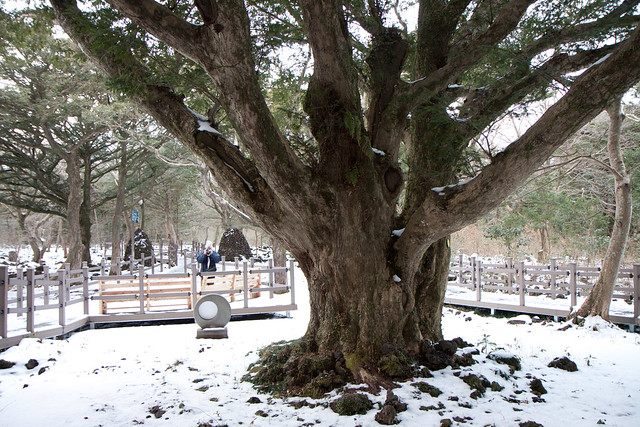
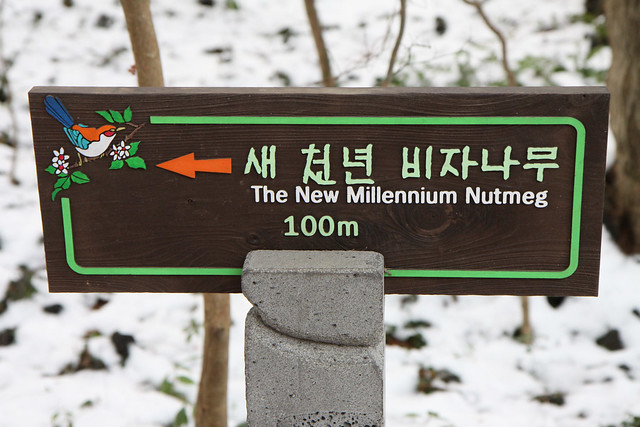
The New Millennium Nutmeg is the oldest nutmeg tree in Korea. The tree is more than 800 years old and is located in the Bija-rim forest, Jeju Do island.

110103-172851_ 7636_50D 110103-172813_ 7635_50D 110103-172402_ 7632_50D


08 September 2011

Hyeopja Smoke Mound

110103-113459_ 7512_50D

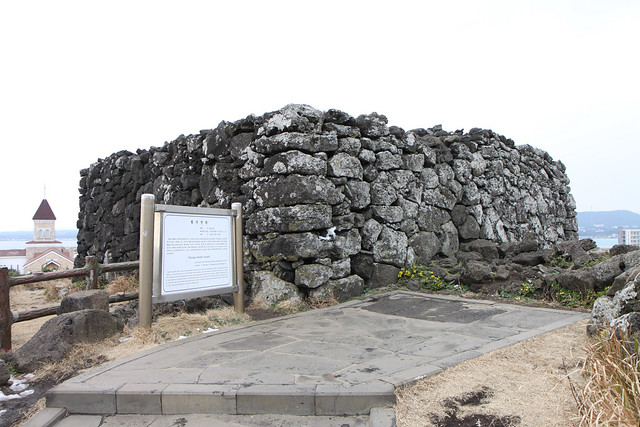
Near the All In House on Jeju Do island (South Korea) you can find the Hyeopja Smoke Mound. Smoke mounds were used as a kind of communications network to deliver messages around the island. There are 38 smoke mounds on Jeju Special Self-Governing Province. During the day or evening smoke was used to warn of enemy invasions and emergencies. When it was cloudy or rainy, the mound keeper had to ran in order to deliver the news.

110103-113124_ 7508_50D

The view around the smoke mound.


07 September 2011

All In House, Jeju Do Island, South Korea

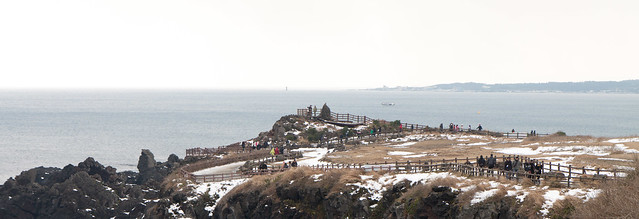
One of the first sights we visited on the island of Jeju Do is the coastline near the All In House, located near Seopjikoji (Gosung-ri, Seongsan-eup, Seogwipo-city).

The All in House is South Korea’s first drama memorial for the popular TV miniseries, ‘All In’ (2003). The house is located on the east part of the island.


Larger map

All In House, South Korea

All In House, South Korea
Garden All In House

 110103-114520_ 7519_50D
You can take a walk along the coastline.


06 September 2011

Gare du Nord, Paris

20110901-194847_0006_iPhone_Marc
iPhone 4 with Pro HDR

One of the metro exits near station Gare du Nord, Paris.


05 September 2011

Hilversum Town Hall

Raadhuis van Hilversum
Camera: iPhone 4 with Pro HDR

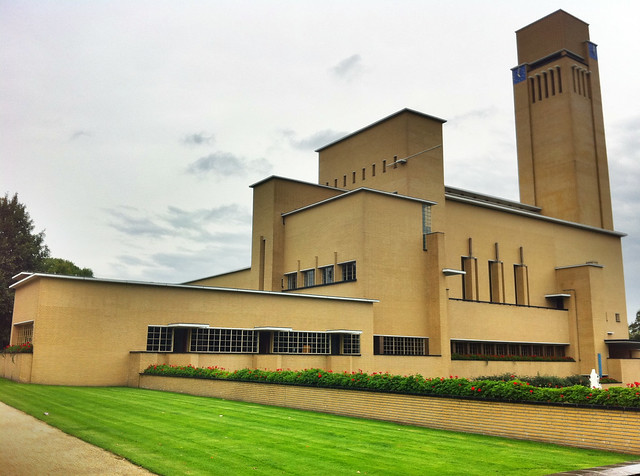
I recently visited an old school friend. He works in this beautiful building: the Town Hall of the city of Hilversum. The architect W.M. Dudok designed this building. After about 10 designs construction started in 1928. The building was finished in 1931.


31 August 2011

Crowd Funding voor Religie Nu


Fotograaf Eddy Seesing heeft met zijn project 'Religie Nu' fotoportretten gemaakt van 70 religieuze bewegingen in Nederland. De voorgangers van de verschillende religieuze bewegingen zijn gefotografeerd in een belangrijk moment voor hun religie (een zogenaamd  tableaux vivant). Deze fotoportretten zullen tentoongesteld worden in de Kunsthal Rotterdam van 16 december 2011 tot en met 12 februari 2012.

Om de kosten te financieren van het opplakken en plastificeren van de 70 cm grote foto´s doet Eddy een beroep op de Internet community middels ´crowd funding´. Ga naar projectpagina ´Religie Nu´ op http://voordekunst.nl/vdk/project/view/142-religie-nu en steun dit project met een donatie.

Ik had het voorrecht om mee te werken met één van de foto´s en ik was zeer onder de indruk van de compositie die Eddy had gemaakt. Ik zal de expositie dan ook zeer zeker bezoeken om de overige foto's te bekijken.

Meer informatie over het project kan je vinden op Eddy´s web site: http://www.eddyseesing.nl/eddyseesing/cms/cms_module/index.php?obj_id=16184


26 August 2011

The Slant Paradise

The Slant Paradise (2008)

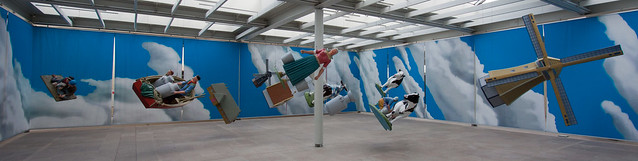
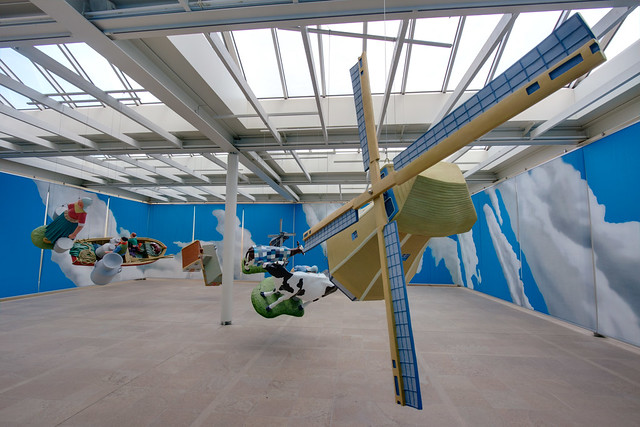
This display was on exhibition at the Museum ‘Beelden Aan Zee’ in Den Haag. Several pieces of art of the Chinese sculptor Sui Jianguo could be seen. I have no clue why everything is slanted, but it was fun to see!

The Slant Paradise (2008)

The Slant Paradise (2008)


25 August 2011

Dinosaur Amidst the Wind

Dinosaur Amidst the Wind (2009)

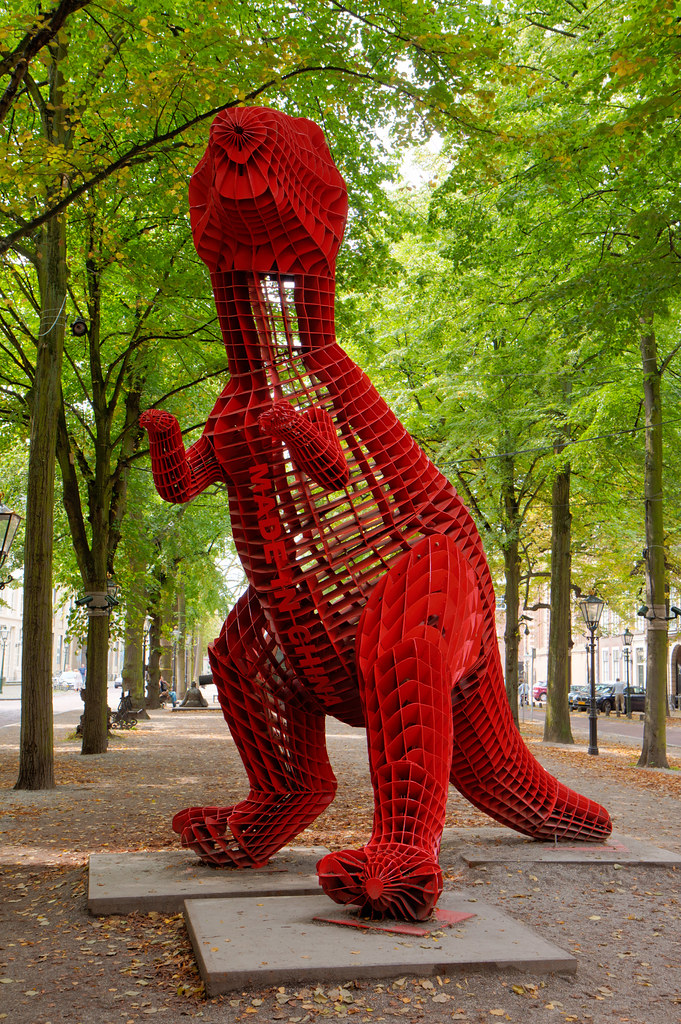
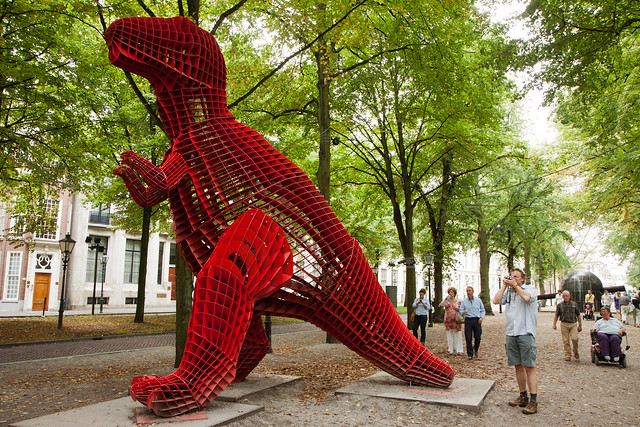
I met this fun creature during my visit to the ‘Beelden Lange Voorhout Route 2011’. It attracted a lot of attention of photographers.

Dinosaur Amidst the Wind (2009)


23 August 2011

The Information Portal to European Sites of Remembrance

The 'Information Portal to European Sites of Remembrance' has recently been opened and gives a good overview of museums and memorials which have information on the victims of the Second World War and the Holocaust.

The information portal gives an overview of some of the museums located in the Netherlands dedicated to World War II. As you may remember I visited the Verzetsmuseum (Dutch Resistance Museum) during Wikilovesart. The people from the information portal noticed this and requested permission to use the photos on their web site. I gave them permission under the Creative Commons License (of course!). At the moment the following photos are used:

  • 'Poster of the Dutch National Socialists in the exhibition' on the 'Introduction' page of the Dutch Resistance Museum
  • 'Resistance Museum in the Plancius building' on the Victims page
  • 'Printing-press' and 'View onf the exhibition' on the 'Remembrance' page
You can download a PDF version of the pages here.


01 July 2011

Maman the Spider in London

Maman, the Spider, Tate Modern, London

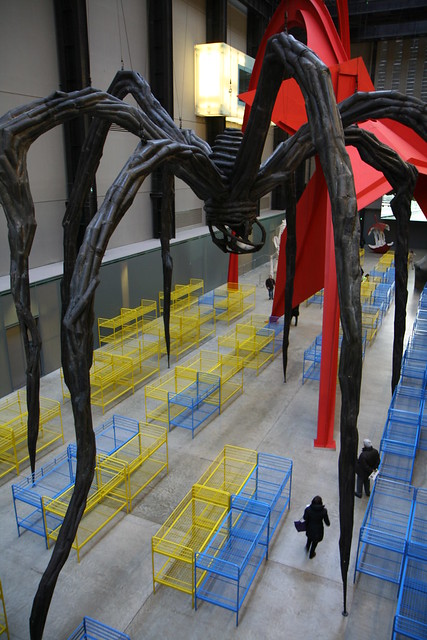
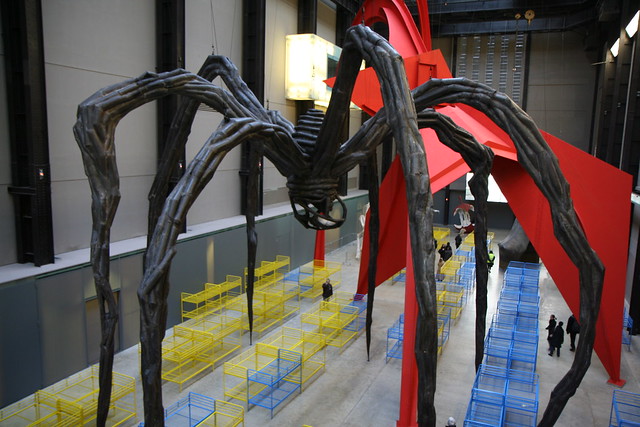
This strange creature looks like a spider and is made by the artist Louise Bourgeois. It is called Maman and is on display in the Tate Modern, London.

Maman, Tate Modern, London

At that time I did not know I would meet this creature again… Stay tuned for an upcoming post where I will tell more about the second encounter.


30 June 2011

20 April 2011

Shooting photos with Rick Sammon at Keukenhof and Zaanse Schans

Hand at Keukenhof Gardens

This year I visited Keukenhof for the second time. I got a chance to hang out with well known Canon Explorer of Light photographer Rick Sammon and his wife Susan. They invited me to join them to shoot some photos of the tulips, flowers and tulip fields.
It's great to see how Rick approaches a scene and explains how to take an interesting photo. You can really see why he uses the tag line ‘Explore the light’. Besides the obligatory picture card photos he learned me to look for interesting shots when the light is coming from the side or shining directly into your eyes.

110419-095239_ 9359_50D
A well known spot in Keukenhof. This spot is also featured on the back of catalogue of 2011.

We experimented with some tulips which were backlit. This gives an interesting shadow inside the bulb.

110419-102437_ 9385_50D
Backlit Tulips in Keukenhof

The tulips really pop out the screen when they are backlit from the right angle.

110419-114749_ 9433_50D

We also experimented with HDR and shooting straight into the sun. Rick encouraged me to set the aperture to f/22 and try to get the ‘starburst’ effect of the sun in the photo. It turned out rather nice!
 
110419-111259_ 9429_50D
HDR photo – Canon 50D, Canon 10-22mm, f/22 @ 1/500, 1/250, 1/30 at ISO 200

On this spot it was quite challenging to get a photo without people on it. Although you are not allowed to walk onto the grass, the flowers seem to to be too attractive and people wanted to sit very close to the fields.

110419-105207_ 9400_50D

Fortunately after a while it got less crowded and I could get another excellent starburst photo:

110419-110027_ 9410_50D

I got to try the famous ‘Sammon Swirl effect’:

110419-101509_ 9374_50D

Just outside of Keukenhof we saw some really nice flower fields.

110419-130058_ 9439_50D
You can see a Google Street View photo of this spot on http://goo.gl/maps/2mPn. The flower field is just behind the farm called ‘Beelen’. It is alongside the road N208 as mentioned in the National Geographic article ‘Road Trip: Flower Route, Netherlands’.
Rick got some cool shots with his fisheye lens. Read his blog to see the shots!
After Keukenhof we also stopped by at the Zaanse Schans.

110419-141501_ 9440_50D

It was a really clear day, not a single cloud in the sky.

110419-141840_ 9442_50D

We also experimented with reflections. Here is an example:

110419-144847_ 9450_50D

Timing is crucial, because here is what the shot looks like a few moments later:

110419-145044_ 9452_50D

There is no reflection because a slight breeze disturbed the water surface.

Inside the gift shop I made a great HDR photo:
110419-145420_ 9454_50D
Canon 50D, Canon 17-55mm, f/5.6 at 1/40, 1/160 and 1/10 @ ISO 800

In Rick’s blog post for this day he mentions a few tips. This is how I applied them:
- You don't always have to be looking through the camera's viewfinder for a good shot.
Use the live view mode of your camera to see your composition. Or just hold the camera away from you, press the shutter button and look afterwards on the display for the result. I shot the first starburst photo that way. The camera is pointing upwards very near to the ground and it is almost impossible to take a look through the viewfinder or at the display (see also ‘Have fun’).

- Set a small aperture for great depth of field.
A small aperture helps to get everything sharp in the close-up photos and the wide shots.

- Always look up.
That’s true! I think this is one of the reasons Rick found the great spot where we got our ‘starburst’ photos.

- Take the postcard shots, and then take creative shots.
Very true. Luckily I did my share of postcard shots in 2010 so I could focus on the creative shots.

- Have fun.
It always helps to have a companion with you to discuss composition or who keeps an eye on all your photo gear when you are laying down on the ground trying to take a photo with a fish eye lens shooting upwards to a tulip (Rick and Susan: you know which situation I mean :-)

Rick travels a lot around the world. After this visit in Holland he will be in Alaska teaching a class on photographing the bald eagle. Take a look at his USA and International workshops and perhaps you can meet him one day. Highly Recommended!

Susan and Rick: thank you my friends for a wonderful time and giving me the opportunity to show you around!


05 March 2011

iPhone, Hotel Rooms and Internet Access or How to Use an Apple Airport Express While on the Road

iPhone 4 is a perfect companion for travel – light weight, fast and has all the right applications. On my latest trip to Seoul and Tokyo I didn’t want to lug around a heavy laptop to stay connected to the Internet, so the iPhone seemed like a logical solution.
There were some problems to solve. All hotels I visited have free wired Internet access in the hotel room. Wireless Internet access was only available in the lobby or in the hotel room at extra cost. In Japan finding a Wi-Fi network is even harder to find because the NTT DoCoMo network standard is used much more. How do I connect an iPhone in a hotel room with free wired Internet access without running into extra costs?
Luckily I found a solution. The Apple AirPort Express is a small light weight IEEE 802.11n router. Apple specifically mentions on the Airport Express web page that the router can be used to share a wired network connection in your hotel suite.
Even though Apple mentions you can share a wired connection in your hotel room, the manual does not help you a lot. It basically suggests to plug in the AirPort Express and to configure it with the AirPort Utility. There is one little snag: the AirPort Utility requires Windows OS or Mac OS. There is no iOS app to configure the AirPort Express. So does this mean I still have to take a laptop with me?
The alternative was to configure the Airport Express at home and hope that it would work with the hotel wired network. But which configuration should I use?
After evaluating all possible options the AirPort Express offers, I decided to configure it as a bridge. Here is how I configured the AirPort Express before I left home.  This configuration worked in all the hotels I visited!
Start the AirPort Utility and use the following information to configure the Airport Express:
Click on the AirPort icon and enter the following:
* Tab Base Station
Airport Express Name: <your name>
AirPort Express Password: <your password>
Verify Password: <your password>
Set time automatically: check and set the server to time.apple.com
Time Zone: CET
Allow setup over the Internet using Bonjour: uncheck
* Tab Wireless
Wireless Mode: Create a wireless network
Wireless Network Name: <your network name>
Allow this network to be extended: uncheck
Radio Mode: 802.11n (802.11b/g compatible)
Channel: Automatic
Wireless Security: WPA/WPA2 Personal
Wireless Password: <your network password>
Verify Password: <your network password>
Click on the Internet icon and enter the following:
* Tab Internet connection
Connect using: Ethernet
Connection Sharing: Off (Bridge Mode)
Click on the Music icon and enter the following:
* Tab Music
Enable AirTunes: uncheck

Before you leave your home, try out this configuration. Connect the AirPort Express with a LAN cable to a wired network with an active DHCP server and working Internet connection. On your iPhone select the Airport Express Wi-Fi network and enter the wireless password. When the iPhone has successfully logged in, check if you have Internet connection.
In a hotel room plug in the AirPort Express into the mains and wired network connection. Wait until its light turns green. Then, fire up your iPhone and try to connect to the Wi-Fi network of the AirPort Express. You don’t need to change your Wi-Fi settings, since the network name and password stay the same. If you are lucky you will have Internet access. You can even try to connect a second iPhone! The Airport Express supports a maximum of ten simultaneous wireless devices.
So, how does this all work?
First the AirPort Express requests a connection with the hotel network. The hotel network will allocate an IP address to the AirPort Express and tell it how to connect to the internet (DHCP protocol).
After this connection, the AirPort Express will function as a bridge between its wireless network and the hotel’s network. Wireless devices with the right credentials will be accepted by the AirPort Express and all network requests will be passed on to the hotel network unmodified. 
From the hotel network side it looks like all the devices are connected to the hotel room’s network connection. Data packets over the LAN cable will be translated to Wi-Fi packets on the wireless network, and vice versa. By default an iPhone uses the DHCP protocol to obtain an IP address. The hotel network will allocate this IP address for the iPhone.
airport express 
AirPort Express router in action in a Tokyo hotel room.
Tip: bring along your own LAN cable. Most of the time the spring loaded tab (or “hook”) is broken off with the hotel supplied LAN cables. This causes the modular plug to slip out of the Airport Express and disconnect the LAN connection.


10 February 2011

Flying to Seoul and Jeju-do, South Korea

This year started good with a Finnair flight Amsterdam – Helsinki – Seoul. It was the first time I flew with Finnair and it was a very pleasant experience. The crew was friendly, modern airplanes and the Helsinki Airport was small and easy to move around.

Finnair entertainment system booting

The Finnair entertainment system apparently uses Linux as its operating system.

20110102-083750_0073_iPhone_Marc

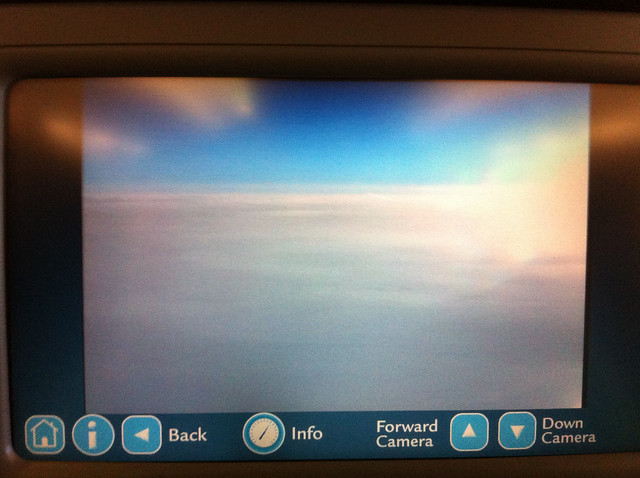
During the flight you can select the view from a forward camera, or a downward camera. This was the first time I could see a take off and landing just like the pilot sees it!

 20110102-090319_0075_iPhone_Marc

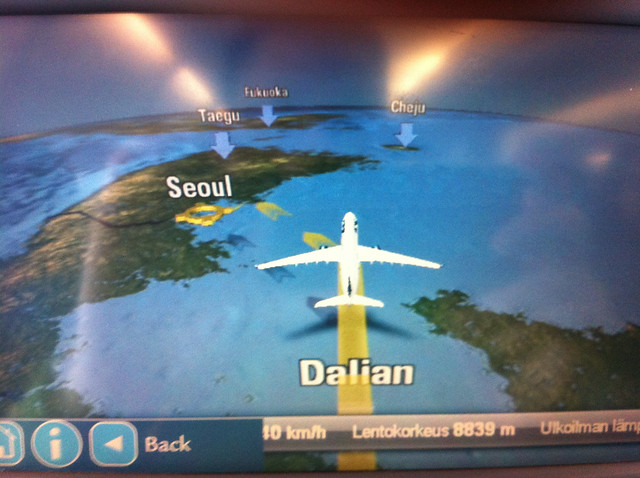
We approached Seoul from the north west. You can see the island of Jeju-do (or Cheju) further down south.

 20110102-095546_0076_iPhone_Marc

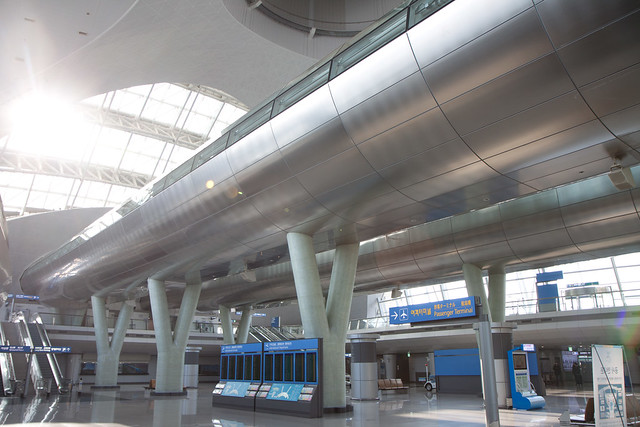
Arrival at Incheon Airport

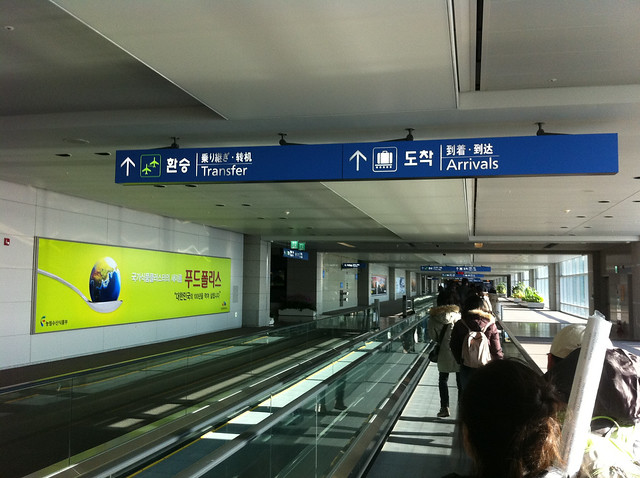
Getting around the airport is easy. All signs are also in English and many of the younger Korean people like to talk English.

20110102-095923_0008_iPhone_Linda

Welcome to Seoul!

Seoul was actually just a stopover. We arrived in the morning at Incheon Airport, took a train to Gimp Airport and boarded a Jinair flight to Jeju-do. The entire trip took about 24 hours…

110102-104918_ 7454_50D

Train station near Incheon Airport

Before we boarded the plain to Jeju-do we ate some lunch

 110102-120828_ 7466_50D

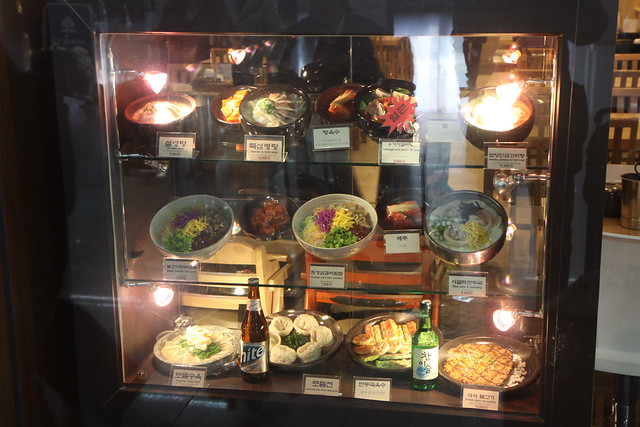
Example dishes at Jeju-do Airport

20110102-121208_0085_iPhone_Marc

My first Korean food at Gimp Airport

At Jeju-do we ate one the local specialties: Okdomi
Okdomgui

Okdomi
It is a ubiquitous and tasty a local fish that is semi-dried before grilled and has a gourmet taste.
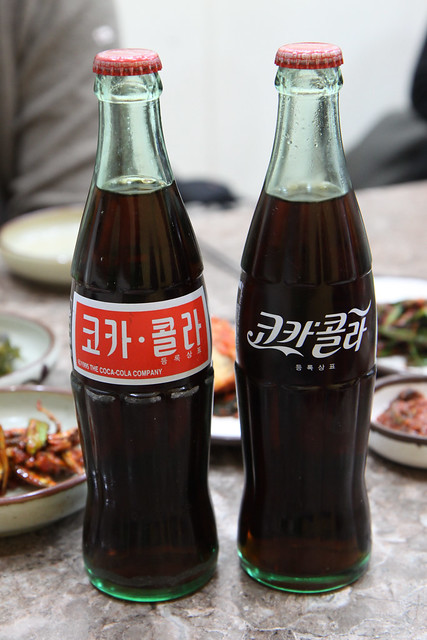
110102-182055_ 7481_50D 

Korean Coca Cola

Standard Soputh Korean side dishes

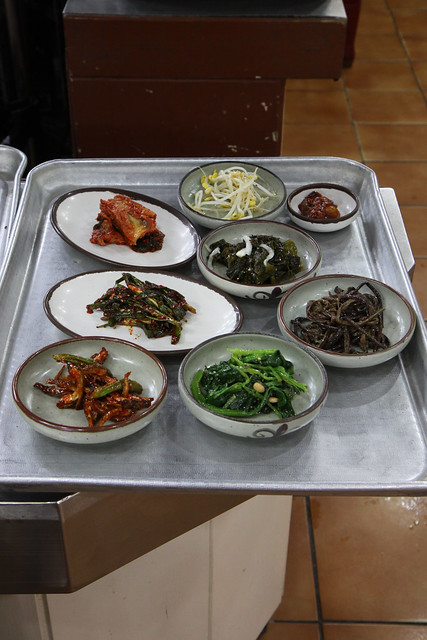
Standard South Korean side dishes: kimchi, bean sprouts, spinach, and other stuff

20110102-175650_0015_iPhone_Linda

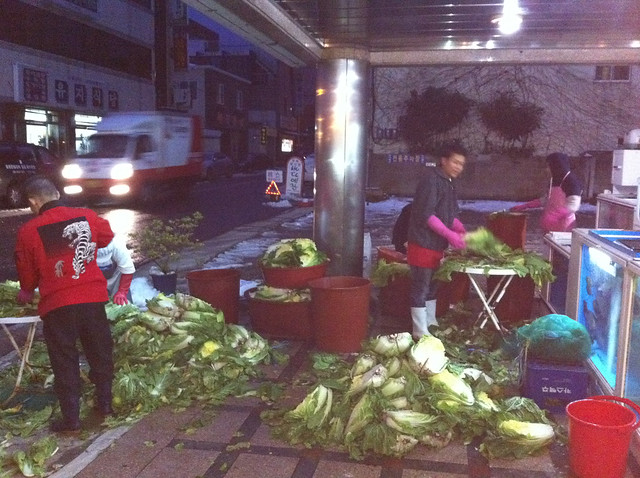
Outside the restaurant: preparing cabbage for kimchi
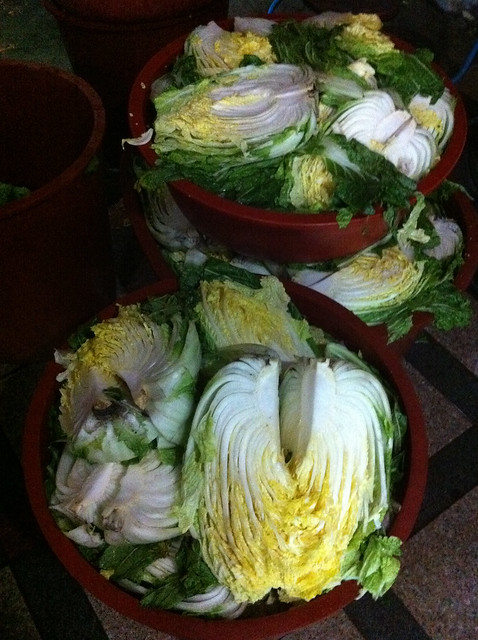
20110102-191548_0096_iPhone_Marc

Cabbage for kimchi

20110102-191723_0098_iPhone_Marc

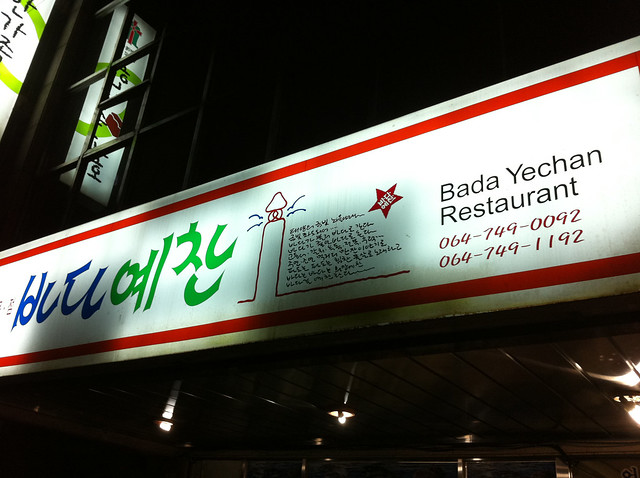
We ate the fish at the Bada Yechan Restaurant in Jeju-do.


09 February 2011

iPhone 4 Photography Apps

The iPhone 4 is also a very good camera – 5 megapixels and most important small, light weight and I carry it always with me!

Here is my list of photography apps which I use to take awesome photos:

ProCamera_new_icon_large
ProCamera
ProCamera replaces the standard Camera app on my iPhone for the following reasons:

  • Faster startup
    ProCamera loads much faster when you exit the app and re-open it.
  • Expert Mode
    You can set the focus point and exposure point on two different areas on the photo. In the standard Camera app the focus point is also used to determine the exposure. This is not always desirable.
  • Virtual Horizon
    Helps you to keep the horizon level in your photos.
  • Anti-Shake system
    ProCamera takes the photo will take the picture when you hold your iPhone still.

pro hdr
Pro HDR
I use Pro HDR to take photos with an increased dynamic range. Photos with extreme light/dark situations look much better when taken with Pro HDR. Pro HDR lets me tweak the end result, the HDR mode of the standard Camera app does not allow this.

app flickr
Flickr
This is the official Flickr app. Good to do a quick upload, or to set the privacy level of a photo.

flickstackr
FlickStackr
I use FlickStackr to do some serious browsing through Flickr photos. Automatic caching of photos makes this app much faster then the official Flickr App.

photo wallet
Photo Wallet
I use Photo Wallet to download my Flickr photos on my iPhone. I can show the photos without being connected to the Internet.

tpe_01_logo
The Photographers Ephemeris for iOS
The Photographer's Ephemeris (TPE) is a handy app to determine when and were the sun will come up and where it will set. I use this to plan my arrival times at locations where I want to shoot photos. There is also a free Windows version. I wrote about this version in my blog post ‘Sunrise and Sunset For (Landscape) Photographers’.

360pano
360 Pano
360 Pano creates panoramas in real time. Just start up the app, pan around and save the results. I got some pretty good panoramas with this.

Jongmyo Shrine Panorama

Panorama of Jongmyo Shrine in Seoul, South Korea taken with 360 Pano
Click here to see a larger version.

psexpress
Photoshop Express
I use Photoshop Express for those pesky photos which are rotated with the wrong side up when viewed, or to do a quick crop.

Instagram-App
Instagram
Fast and fun way to share photos.