31 May 2010

Discover Amsterdam with Microsoft tag

Especially for the 2500 visitors of WCIT 2010 around 6000 Microsoft tags have been placed in Amsterdam. Just scan the tag and you can follow one of historical routes. For all of you who cannot be in Amsterdam, here is a tag to get you started:

wcit amsterdam tag

In my previous post I wrote Microsoft tag is not used that much in Holland. I guess Microsoft must have read it, and decided to do something about it (-:


27 May 2010

QR Codes and Microsoft Tags

For personal use I did a quick scan of the capabilities of QR codes and Microsoft tags. Before I share my experience first a quick introduction.

QR Codes
A QR Code is a two-dimensional bar code developed by the Japanese corporation Denso Wave in 1994. The letters “QR” stand for “Quick Response” because the QR Codes can be decoded at high speed from live video streams.

At first QR Codes were used to identify car parts. Somebody came up with the idea to read QR Codes with a mobile phone containing a camera. This way QR Codes could be used outside a factory, in the consumer world. Later on, when mobile phones got internet access, someone came up with the idea to use QR Codes to store URLs or other type of information like phone numbers, email addresses, vCards.

The recommended minimum size of a QR Code is 2 by 2 centimeters. Even more space might be needed when more data is encoded inside the QR Code,

Microsoft tags
A Microsoft tag is a two-dimensional bar code developed by Microsoft. The company refers to it as a so called High Capacity Color Barcode (HCCB). Clustered of coloured triangles are used to encode the information (instead of square pixels). As a result data density is increased and Microsoft tags can encode the same amount of information in smaller images.

Application
QR Codes can store a string of characters which can represent several forms of information. Examples are:

  1. phone number
  2. email address
  3. plain text
  4. web address (URL)

A QR Code can be decoded locally in the mobile device by the reader software, just like “normal bar codes”. The size of a QR Code grows with the amount of data stored. At some point it is not practical anymore to store all the data inside a QR Code.

A method has been devised to give a mobile user access to data while maintaining the QR Code at a reasonable size. The QR Code is used to store a web address. A mobile device (like a phone) scans the QR Code, converts the QR Code to a URL and accesses the URL for more information. This way the QR Code image stays relatively small, while the user has access to much more data than stored in the QR Code itself.

Another advantage for the publisher of the QR Code with URLs is that it is possible to count the number of “hits” on the web pages. This gives an idea how much a particular QR Code is used.

Microsoft tags encode a 13 bytes of raw data. The Microsoft tag reader converts these 13 bytes into a URL (internet access is required). The Microsoft tag reader then starts the browser of the mobile device to access the data.

Usage
The use of QR Code is free of any license. Denso Wave owns the patent rights on QR Code, but has chosen not to exercise them. QR Codes were used first in Japan. The United States and Europe are slowly following.

Microsoft tag has been in beta until May 2010. Usage of Microsoft tag is described in the Tag Terms of Use. Basically it is free to use the tag web site to generate codes, manage them, and look at the statistics.

The following statement drew my attention (version 27 May 2010) section 13.3 Term and termination:

QUOTE
Microsoft may terminate this Agreement, the API or any Service, or may cancel or suspend your right to use any Tag or the API or any Service for any reason, or for no reason, at any time. In the event of a termination of the API or Service as a whole, Microsoft shall use commercially reasonable efforts to continue the Basic Service, Reporting Service and API in effect as of the date of such termination for a period of at least two (2) years from the termination date. For purposes of clarification, Microsoft will have the right to terminate any or all of the API, Service or any functionalities relating to existing Tags, without any obligation to continue the Service or API for reason of (a) law or regulation; (b) an event of force majeure; (c) actual or threatened court action; or (d) your breach of this Agreement.
ENDQUOTE

Examples
Here are some examples of QR Codes. These codes were generated by the Kerem Erkan’s QR Code and 2d generator.

kemerkan code more than 60

 kermerkan code mchang blogspot web site

Here are some examples of Microsoft tags. Tags are made by the Microsoft Tag Manager.

 mchangsp_blogspot_com_201052774750

More_than_60_characters_201052775137

I will describe my experiments with QR Codes and Microsoft tags in the following order:

  • creating tags
  • placing tags on paper and web site
  • reading tags

Creating QR Codes and Microsoft tags
QR Codes can be created with several web sites. Examples are:

I had best results with the QR Code and 2D Code Generator. It is one of the few code generators where you can specify a border. This is necessary because there has to be a 4 module white space (quiet zone) around the QR Code. On my web site with a black background QR Codes generated with the Nokia generator are not recognized because they lack the border.

Microsoft tags are generated on the Microsoft Tag web site.

Placing QR Codes and Microsoft tags
I experimented with placing the bar codes on my personal web site and on paper.

Placing QR Codes on my personal web site turned out to be tricky. QR Codes need a quiet zone around the actual QR Code. At the time of writing, my web site has a black background, and the quiet zone was not always presented. This had impact in the reading performance. Read on for more information.

QR Codes can be rather big in size, depending on what you encode. The recommended minimum size is 2.5 centimeters. Read the Kaywa white paper for more information. QR Codes on a business card can dominate the design.

Microsoft tags are much smaller. so they are more easily placed. They are more visually attractive. You can even design custom tags to optimize the look of the Microsoft tag in relation to your product.

Reading QR Codes and Microsoft tags
The QR codes were read using the i-nigma Reader version 3.06.01 running on a HTC Touch HD with Windows Mobile 6.1 using its 5 megapixel camera. The QR Code is recognized when it is inside the reading area of the software and reasonably sharp and big enough. Reading QR Codes placed on a black background failed when there is no quiet zone around the QR Code. I encountered this while placing the QR Codes on my blog with a black background. I also printed QR codes with on a Canon MP640 printer. The QR Codes are recognized as long as they are larger than 2.5 centimeters.

Microsoft tags were read using the Microsoft tag reader version 3,0,0,88 also running on the HTC Touch HD. Reading Microsoft tags was much easier. They were recognized, even when the tag was not in focus, or while the tag was moving (due to camera shake). The Microsoft tag size printed on paper in just under 1.5x1.5 centimeters during these tests, so this was rather impressive.

My experience
At the moment QR Codes are widely used than Microsoft tag. QR Codes are in use for more than 14 years, and are being adopted by more and more companies. Even Google is experimenting with QR Codes in the project Google Favorite Places.

Microsoft tags are not much used at the moment. It has only been around for 2 years, so we have to wait and see. I do not like the Tags Terms of Use. Microsoft’s statement that support for Microsoft tag can be revoked, is not appealing to me.

For my own personal use I would like to use Microsoft tag. However, the terms of use are a little odd at the moment, and Microsoft tag is not wide spread in use. QR Code is getting more and more attention in the Netherlands. The Dutch public transport web site www.9292ov.nl uses QR Codes to give access to calculated travel journeys on mobile phones. Magazines like Esquire and Bright give media attention to QR codes also. So for my personal business cards I would use a QR Code, and I will keep a close eye on Microsoft tag.



11 May 2010

The Moment is There!

The New York Times started publishing the photos they received for their initiative “A Moment in Time”. The photos are presented in a Flash presentation. Click here to start at my photo. The original NY Times publication is here: “The Moment You’ve Waited For”.


10 May 2010

Amsterdam Noord/Zuidlijn / North/South Line

The city of Amsterdam is constructing a new metro line running from Central Station in the north going roughly south to Amsterdam Zuid (South). Hence the name Noord/Zuidlijn (or North/South Line in English). Drilling the metro tunnels under ground is challenging and controversial because the tunnels go straight under Amsterdam’s historic buildings.

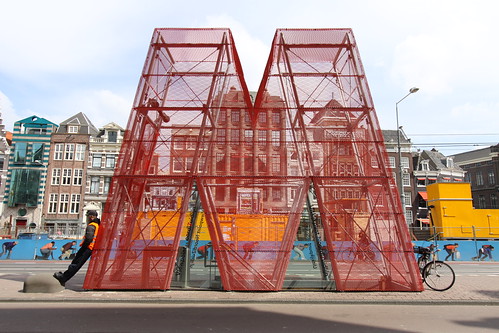
To show the general public what is going on under ground a special ‘uitkijkpunt’ (viewpoint) has been made near station Rokin (one of the new metro stations).

Entrance / Ingang Uitkijkpunt Noord/Zuid Lijn Amsterdam
Entrance to the Noord/Zuidlijn uitkijkpunt.

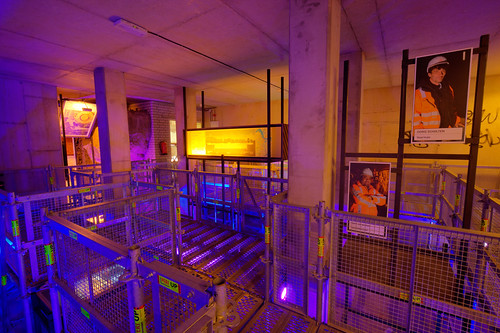
This viewpoint is below ground. It gives an overview of what is going to be constructed, and a glimpse of the actual building process. Going down one level you arrive at some sort of exhibition area.

Uitkijkpunt Noord/Zuid Lijn Amsterdam
Exhibition area

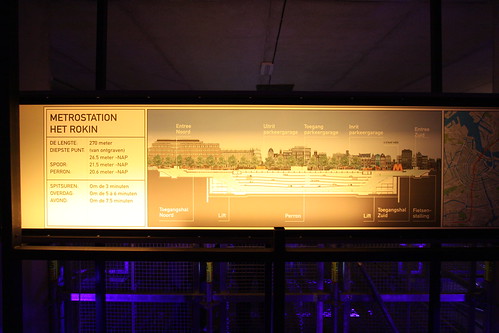
This level and the one below will be part of an underground parking garage. The actual metro track will be 21.5 meters below NAP (see the end of this post for an explanation of NAP). The metro station will be 270 meters long, deepest point will be at 26.5 meters below NAP. The exhibition area is situated just below the M on the photo below.

Metro Station Het Rokin Amsterdam

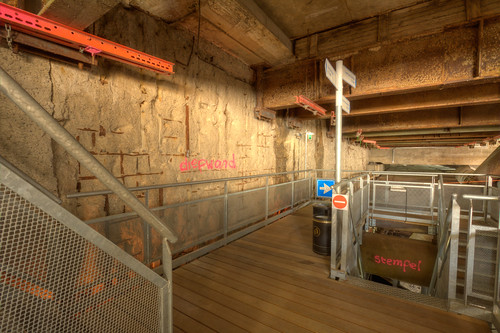
When you walk further, you can go down another level. This is the entrance to the working area.

Entrance / Ingang Uitkijkpunt Noord/Zuid Lijn Amsterdam
Entrance

The wall at the left (called ‘diepwand’) is the actual wall of the excavation. In the top right and bottom right you can see the ‘stempels’ – T-bars or tubes which run from one wall to the other wall. The ‘stempels’ provide support so the excavation does not collapse.

Going down another level you can see the place where the drilling takes place.

Uitkijkpunt Noord/Zuid Lijn Amsterdam
Upper level parking structure

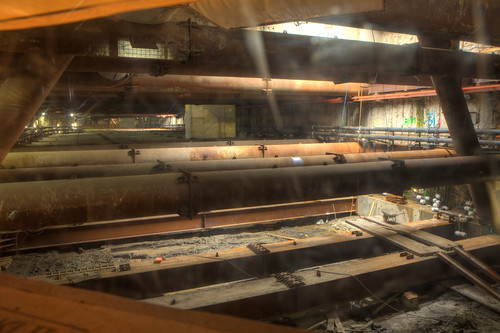
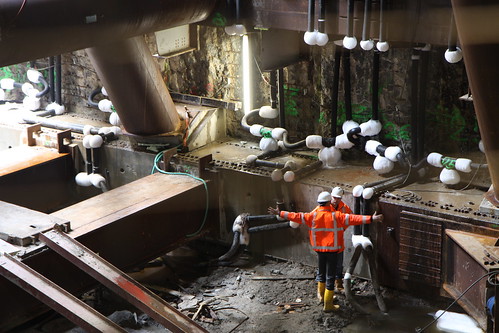
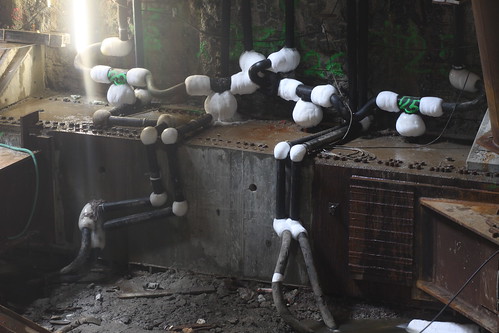
This will be the upper level of the parking structure. Here you can see the many ‘stempels’ which provide support for the outer walls of the excavation. Below this floor the metro tunnel will be drilled. To prevent the tunnel from collapsing during drilling, the earth will be frozen solid first, before drilling starts. In the lower right corner you can see the tubes which cool down the earth. Because the cooling process is already going on for several months ice has formed at the joints.

Bouwput Noord/Zuidlijn / Excavation Noth/South Line Amsterdam

A close-up:
Uitkijkpunt Noord/Zuid Lijn Amsterdam

Unfortunately this is all you can see. You have to look through a metal grid or some perspex sheets in a wooden board to see something.  The grid and wooden board limit what you can see.
Some comments on the photos

The exhibition area photo and the entrance photo are HDR photos composed of three photos (-2, 0, +2 stops exposed). The upper level parking structure photo is an HDR photos composed of 11 photos each 1 stop apart. I decided for such a large amount of photos because the sunlight can be seen in the top right of the photo, and it was pitch dark in the area just below. The photos were shot through a clear perspex sheet, so some streaks can be seen.

---
NAP
NAP stands for Normaal Amsterdams Peil (‘normal level of Amsterdam’) and is a reference level for all height measurements in the Netherlands. NAP is roughly the sea level at high tide.


06 May 2010

Keukenhof

Keukenhof is the world’s largest flower garden located near Lisse, The Netherlands. Each year Keukenhof is open for only two months, usually from late March to mid May. This year I visited Keukenhof to take photos of the beautiful flowers.
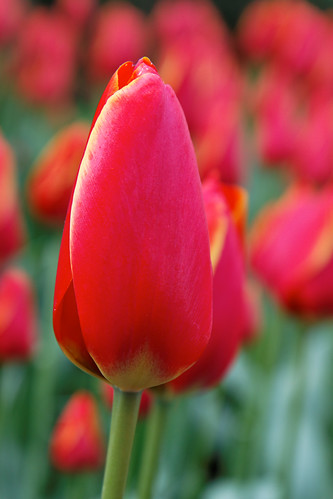
It was a clear, overcast day, perfect for photography. A sunny day is nice, but the contrast can be too high. Taking close-up photos is a challenge. The flower beds are located in lawns and you are not supposed to walk on the grass. Even though, take a look at the first photo I took:
Keukenhof Red Tulip
I discovered the automatic white balance tends to subdue the bright colours of the flowers. Take a look at the following photos. The first photo is the standard, out-of-the-camera JPEG image. The second photo is a JPEG image, processed with DXO Optics 6.1 from the RAW file with white balance set to daylight.


Photo 1
100504-093842_ 2582_50D

Photo 2
Keukenhof Yellow Tulips

The actual colours of the flowers are like the ones in photo 2. It turned out to be that the daylight white balance produced the correct colours for the photos taken outside.
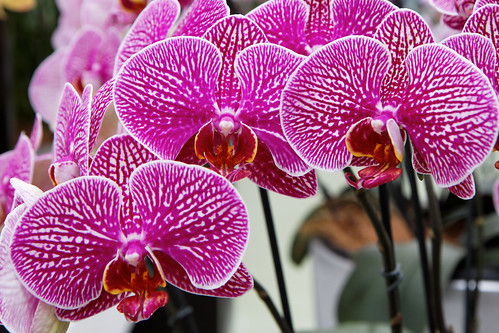
In the morning, it started to rain just a little bit. Luckily, Keukenhof also has indoor exhibitions. Here are some photos of orchids on display.
Keukenhof Orchids
Keukenhof Orchid
Keukenhof Orchid

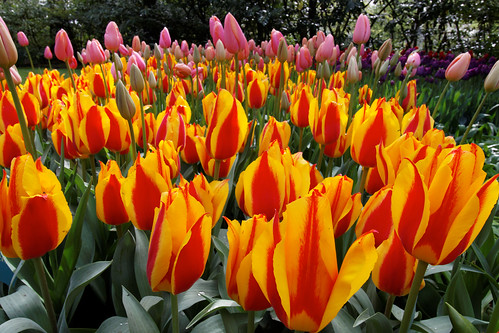
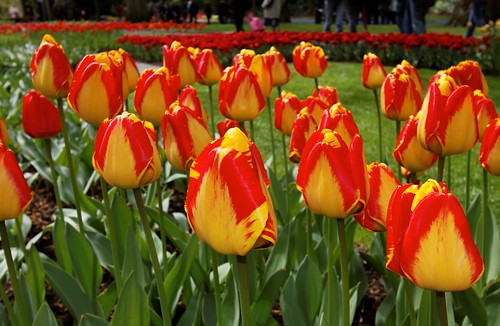
After a while it stopped raining, and I could take some photos of the tulips up close and personal.
Keukenhof Tulips
Keukenhof Tulips
Keukenhof Tulips Keukenhof Tulips

Here is an experiment with flash photography. The ambient exposure is stopped down –1 stop. Flash exposure is compensated with –2/3 stop.
Keukenhof Tulips

The colours are really fantastic.
Keukenhof Tulips Keukenhof Tulips Keukenhof Tulips Keukenhof Tulips
Keukenhof Tulips

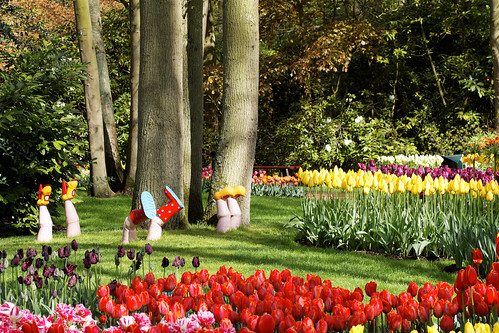
Here is an interesting artwork. It is called 'Looking at bulbs' .
Keukenhof - Looking at Bulbs

The tulips and other flowers are situated in a beautiful garden.
Keukenhof Lake and Water Fountain Keukenhof Garden

Keukenhof also has other plants, besides tulips.
Keukenhof Blossom
 Keukenhof

You can see all my photos in a slideshow by clicking on this link, or click on the photo below.


How to Attach your Gitzo ball head to a tripod

In my Gitzo GT1541T tripod review I mentioned the ball head sometimes comes loose. This is because I could not tighten the ball head tight enough on the tripod legs. I considered using Loctite, but did not use it because I would have to clean the threads when I want to unscrew the ball head (to use it on my Gorillapod).
On YouTube I found a tip which seems to work. The trick is to push down on the ball head when you tighten it on the tripod.
Take a look at the video below where it is explained in more detail.


04 May 2010

Gitzo GT1541T tripod and GH1780QR ball head review

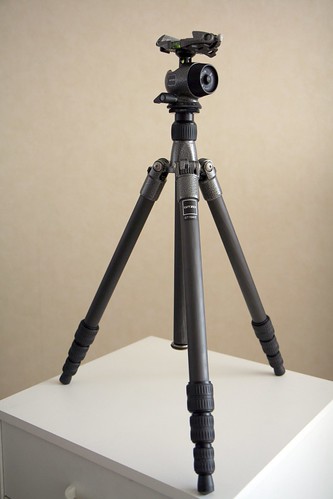
Gitzo GT1541T Tripod / Gitzo GH1780QR ball head

Introduction

The Gitzo GT1541T tripod and the Gitzo GH1780QR ball head are my trusty companions for long exposure, HDR and panorama photography. I chose this combination because it is very light weight, and can be folded into to a very compact package. First I will describe some details of the tripod and the ball head. Then I will tell about my personal experience while using this combination.

Gitzo GT1541T tripod

The Gitzo GT154T tripod is made from carbon fiber. Six layers of carbon are used to form the legs. Carbon gives the best load bearing to (tripod) weight ratio, but is also the most expensive material compared to aluminum or basalt. The tripod weighs 0.97 kg and can support up to 8 kg, so the tripod can support almost eight times its weight. Maximum height is 113 cm, when you extend the center column it is 140 cm.

The legs can be extended in four sections. Gitzo uses a ‘twist-and-lock’ system. This version comes with a new Anti Leg Rotation System. You can loosen all the twist locks at the same time, pull the leg down and tighten the locks individually. The tripod has rubber feet (non-removable).

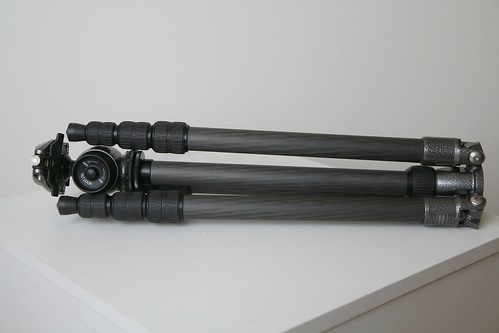
The tripod is a member of the Gitzo traveler series. This means you can rotate the tripod legs 180 degrees. This is handy when you want to carry the tripod in a bag or suitcase.

Gitzo GT1541T Tripod / Gitzo GH1780QR ball head

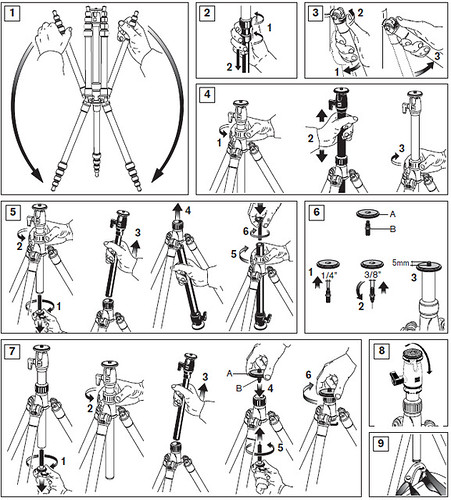
The center column can be removed and the ball head can be attached directly on top of the tripod (ground level set). No tools are needed. Alternatively, the column can be easily inverted. This is handy for macro work when you have to get very close to the ground.

Here is a picture out of the manual to give you an idea what this tripod is capable of:

gitzo traveler manual picture


Gitzo GH1780QR ball head

I use the Gitzo tripod in combination with a Gitzo GH1780QR ball head.

Gitzo GT1541T Tripod / Gitzo GH1780QR ball head

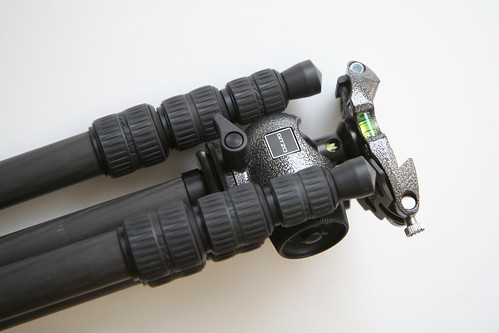
The ball head has the following features:

  • double quick release safety system
  • three leveling bubbles
  • separate pan control

The Gitzo quick release system uses a quick release plate which you attach to the bottom of the camera. When you slide the plate into the ball head you hear a click when the plate is locked into the ball head. You then close a lever and tighten a screw to firmly fix the plate.

Releasing the camera is a two part process:

  1. open the release lever so the camera can slide freely on the ball head.
  2. press a button and slide the plate out of the ball head.

The ball head has three leveling bubbles: two in the quick release plate and one in the stem. You use these leveling bubbles to get perfectly leveled images. No more crooked horizons or strange looking buildings!

The ball head can be rotated (panned) independently of the front-back or lateral movement. This enables you to do easier last minute adjustments.

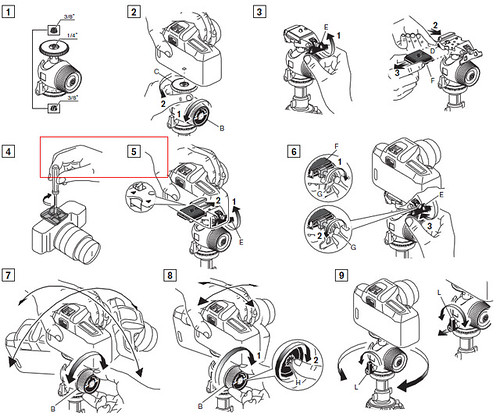
As a picture tells more than a thousand words, here is a picture from the manual to illustrate the features of the ball head:

gitzo ball head manual picture


My experience

Before I bought this tripod I did some research on the Internet. Thom Hogan wrote a nice article on it. He writes about all the mistakes and the extra money he spent in search of the perfect tripod and ball head. Be aware that a good tripod and ball head costs money. Of course you can buy a cheaper tripod and ball head. But then you may have to deal with ball heads which ‘sag’ when you load them, tripods which do not work (still blurry images) or are too heavy so you never take them with you.

The heaviest load I would use is a Canon 50D with 70-200mm zoom lens. Another setup would be a Canon 50D, 17-55mm zoom lens and a Nodal Ninja panorama head. I decided to go for something which I can carry with me on holidays. It should be light and portable. A friend of mine could get the Gitzo stuff at discounted prices for me. So it was easy to decide what to buy.

The traveler version is easy to carry around. To take photos on eye level I have to extend the center column. To make the tripod more rigid you can attach a weight (I use my camera bag) to the hook provided at the end bottom part of the center column. When the center column is extended, it can be very hard to reach the hook of the center column. I use a bungee cord to make it easier. Just loop the bungee cord through the camera bag and connect the hooks of the bungee cord to the hook of the tripod.

TIP: When it is windy, let the camera bag rest on the ground when it is attached to the tripod. When your camera bag is suspended in the air, it might act as a sort of pendulum and will introduce even more vibrations.

I selected a ball head with a quick release system. I used to screw/unscrew my camera to the tripod. But in low light situations or when you are in a hurry it is very easy to make a mistake and not fully tighten the bolt into the camera. It happened to me several times that I discovered the bolt was about to get unscrewed from the camera and that everything would fall on the floor.

I like the two step process of releasing the plate from the ball head. With other systems you only need to press a button to slide out the plate. When your camera is attached at an angle, pressing the button could mean the camera slides out of the ball head by itself and falls on the ground. With the Gitzo system the camera will also start to slide when you open the release lever. But the camera will still be attached to the ball head – it is prevented from sliding out! You can only slide the camera from the ball head when the lever is opened and you press the release button.

Gitzo GT1541T Tripod / Gitzo GH1780QR ball head


Click on the photo above to get into the Flickr page where you can see in more detail where everything is located. The release button can be seen on this photo. Unfortunately the Gitzo quick release plates are not compatible with quick release plates of other brands. You have to buy the expensive Gitzo plates.

Everything considered, I can recommend the tripod and the ball head. The tripod is rigid, there is no play and the finish is solid. The mechanism to adjust the ball head works smooth. The leveling bubbles enable you to level the camera very fast. Gitzo has thought of all kinds of small details. An example: the position lever for the panning motion can be adjusted any way you like. On the photo above you can see it is in the horizontal position when it is tightened. If you want another position (like vertical) just pull the lever, rotate it into the position you want and release it!

The entire combination is light enough to carry around all day. I used the tripod in Dubai, French Polynesia, the Netherlands, The UK and many other places. The only gripe I have is that sometimes the ball head comes loose from the tripod bolt. This especially happens when I forget to use the panning lever on the ball head. I am considering to use Loctite for a more permanent fit, but I am also using the ball head on my Gorillapod. Make sure you use the right version – Loctite 243 – so you can remove the ball head when you want to.

UPDATE Read on this blog post ‘How to Attach your Gitzo ball head to a tripod’ how to firmly attach a ball head to your Gitzo tripod.

Videos

Here are some videos which demonstrate the features of the tripod.


02 May 2010

Where I was at May 2, 2010 15:00 hours UTC

Where I was at May 2, 2010 15:00 hours UTC

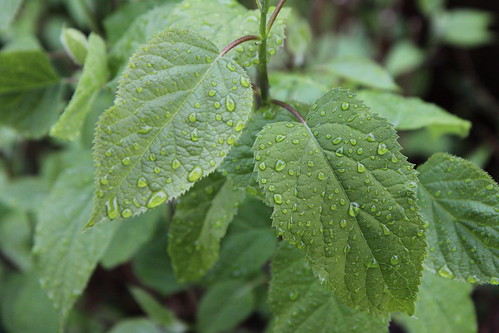
Sunday May 2 was the day the New York Times asked people all over the world to take a photo and send it to them to form a global mosaic. This Sunday it was raining and I decided to upload the photo above. This is the caption I entered: “Rain in Holland gives us two valuable gifts: drinking water and a green environment”.

Send in your photo at http://submit.nytimes.com/moment
More details of the project at http://lens.blogs.nytimes.com/2010/04/30/readers-11/


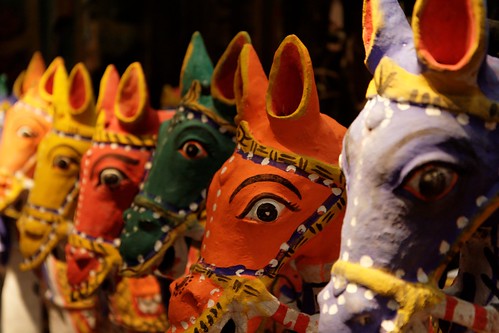
Aiyanar Horses

Aiyanar-Paarden
Aiyanar houses at Tropenmuseum, Amsterdam
Canon 350D | Canon 17-55mm | 1/25 @ f/2.8 | ISO 400

Aiyanar is a Hindu Village god worshipped in the Indian state of Tamil Nadu and Tamil villages in Sri Lanka. Near the temples of Aiyanar there are usually colourful statues of riding horses.

This picture was taken during Wiki Loves Art/NL, hand held (no tripod or flash allowed). I focused on the eye of the second horse from the right. The picture was selected by one of the jurors of the competition. I like this photo because of the wonderful colours of the horses.

It took quite some shots to reach the final result. You can see the various shots I made, here:


01 May 2010

Dubai Burj Al Arab

Dubai Burj Al Arab
One of our destinations on our list of Dubai was the Burj Al Arab – the most luxurious hotel in the world. The hotel is built on an artificial island and only accessible by one bridge. You must have a reservation of some kind (room, drinks, restaurant) to enter the hotel. This is checked just before you can enter the bridge. We chose the least expensive reservation: Afternoon tea in the Skyview Bar. The Skyview Bar can be seen in the top left part of the building.


Driving to Burj Al Arab

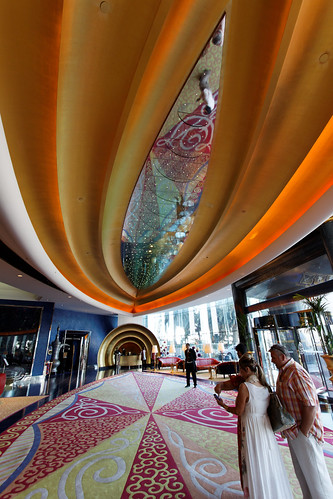
The interior of the Burj Al Arab is decorated with gold leaf and bright colours, and of course extravagant.
Dubai Burj Al Arab - Entrance
Stairs to upper level

Dubai Burj Al Arab - Interior 
Burj Al Arab Interior

Burj Al Arab Lobby
Burj Al Arab Lobby

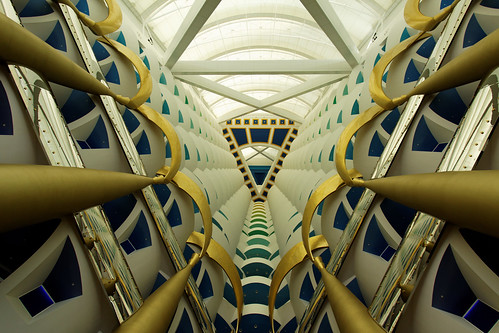
 Burj Al Arab Top
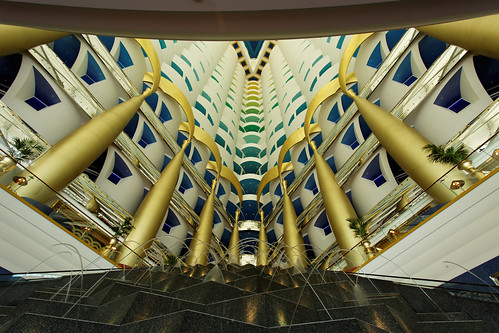
View inside the Burj Al Arab while looking up

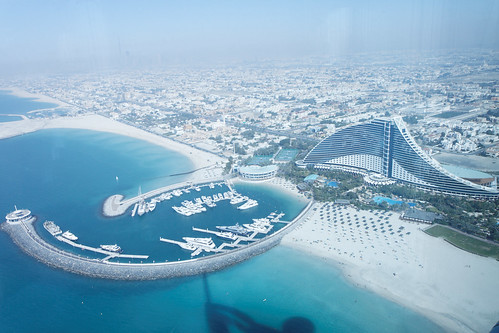
From the Sky View Bar you have a good view of the surroundings.
Jumeirah Beach Hotel

Madinat Souk 
Souk Madinat

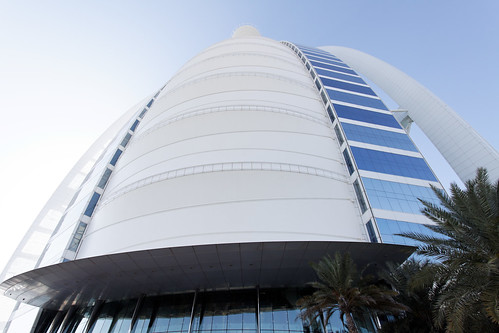
Outside the hotel you can see the Teflon Sail which forms the front of the hotel.
Burj Al Arab Teflon Sail
Burj Al Arab Teflon Sail Front

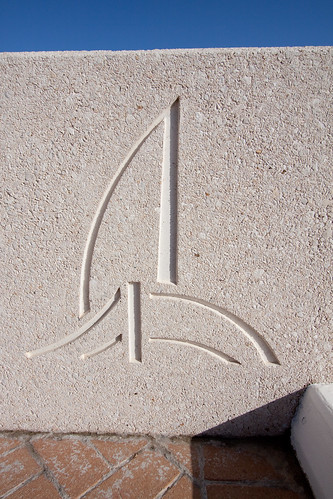
The hotel has its own special logo in stone.
Burj Al Arab Stone Carving

Later that day, we could see the Burj Al Arab from the  Souk Madinat during the sunset – a beautiful end of a nice day.
Burj Al Arab at Sunset
Burj Al Arab at sunset

Burl Aj Arab from Madinat Souk
Burj Al Arab from the Souk Madinat

Jumeirah hotel guests can enjoy free abra rides on the water canals of the Madinat Souk. During the exposure of the photo above an abra passed by. You cannot see the abra itself, just the red and white lights on it.