Showing posts with label flash. Show all posts

17 February 2010

Canon Flash Work

2ndcurtain

Canon has an entire web site named ‘Flash Work’  which explains the various possibilities of automatic and manual flash exposure. The most interesting functions are:

The Canon Flash Masterclass web site is more up to date and contains videos which explain the functions even better. See also my previous blog post ‘Flash Technique’.


16 February 2010

Flash - Second Curtain Sync


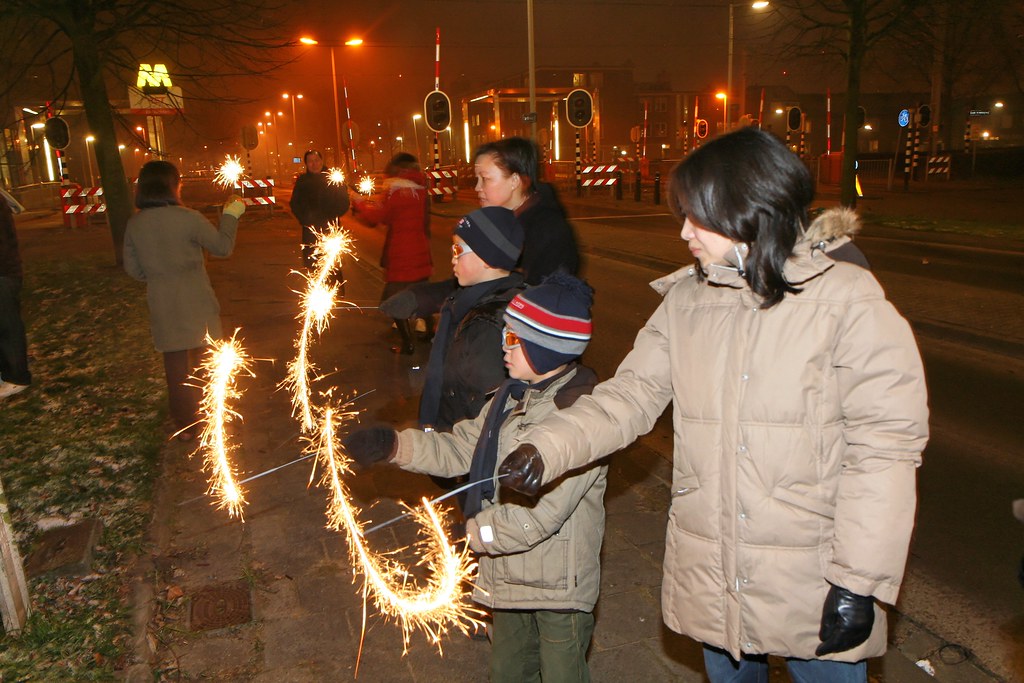
Photo technical details:
Canon 350D | 17-55mm | 3/10 sec @  f/5.6 | ISO 400
Canon 580 EXII straight on flash in E-TTL II mode.

One of the topics of the flash session in our photo course is the effect of synchronizing the flash on the first or second curtain of the camera shutter.  In this blog post I want to illustrate when and why to use second curtain sync.
The photo was shot on New Year’s Eve 2008-2009. I wanted to have the following result:
  • See the trail of the sparklers which were moved up and down.
  • See something of the background. 
    Avoid the ‘people against a black background’ look.
  • Have a ‘natural look’ of the sparkler movement.
In order to get a sparkler trail you need to have a slow shutter speed. With a slow shutter speed the light of the moving sparks is recorded. When you select a shutter speed which is too fast,  you will get no trail at all.
In addition I wanted a ‘natural look’. With that I mean the sparkler sticks should be at the end of the trail,  not the beginning. So I configured the flash to fire just before the shutter closes (second curtain sync or rear curtain sync). This has the following effect:
  • the shutter opens,
  • the movement of the sparkler is recorded,
  • the flash fires so the people  are registered,
  • and the shutter closes.
This way the sparkler is at the end of the movement.

The default setting or first curtain sync would have the following effect:
  • the shutter opens,
  • the flash fires so the people  are registered,
  • the movement of the sparkler is recorded,
  • and the shutter closes.
The sparkler stick would be on the beginning of the spark trail.

So the second curtain sync takes care of having the sparkler in the right position. Now we have to make sure we see something in the background.
I did the following in order to make sure you see the details of the background:
  • put the camera in M(anual) mode.
  • While aiming at the background, set the exposure to 1 stop below the recommended setting of the camera meter.
  • Make sure you have a slow enough shutter speed. In this example I selected 3/10th of a second with an aperture of f/5.6 at ISO 400. Or rather: I selected 3/10 sec. shutter speed and an aperture of f/5.6 and then I adjusted my ISO speed to arrive at the –1 stop exposure for the background.
  • Put the flash exposure on Auto (in this case Canon E-TTL II mode).
These settings have the following effect:
  • The –1 stop exposure ensures you see the street lights in the background of the photo, and that the background is not too bright.
  • The slow shutter speed makes sure you see the movement of the sparklers.
  • With an aperture of f/5.6 the foreground and the background of the photo will be sharp.
  • The automatic flash exposure mode causes the flash to give enough light to illuminate the foreground correctly. I do not have to set the flash output manually.
So that’s how you can do it! While explaining it takes quite a few words, in the real world  I configured my camera within 5 seconds or so. The tricky part is to know what shutter speed, aperture and ISO to choose. I can only say you have to practice a lot and experiment in order to select a good shutter speed. Also you have to learn how to handle your camera and set all the various settings in a dark environment where you do not see all the labels of your buttons!

Remark 1
You should hold your camera very still when shooting the photo because of the low shutter speed. The lens I used is equipped with IS = image stabilization. This means that the lens can compensate for camera shake (within an acceptable range).

Remark 2 
Second curtain sync is called differently by each manufacturer. Canon shooters should look under ‘2nd curtain sync’. Nikon shooters should look under ‘rear curtain sync’. It could be that second curtain sync is not possible with your internal flash. Please check your manual.

Remark 3
It is possible to shoot in Av (Canon) or A (Nikon) mode so you select the aperture of f/5.6 and the camera selects a shutter speed. I do not use this mode because I want to be in full control of the shutter speed as well. When I take the shot and the background looks not right, I only have to adjust the shutter speed to obtain the look I want. In Av or A mode I am at the mercy of the camera when I take my next shot.

Remark 4
The most important thing is to have an interesting subject in the photo. My family loves this photo because they know all the people in it. For you it might be a boring picture (Just admire the sparkler trails then :-)


10 February 2010

Balancing Flash and Ambient Exposure – Where Do You Even Start?

Neil van Niekerk has written a very informative blog entry about balancing flash and ambient exposure. Make sure to read it!

I use the method of under exposing the background by one or two stops.  This is done in M(anual) mode. The foreground or subject is then lit with the flash in TTL mode. Adjustment of the flash exposure is done with flash compensation.


02 February 2010

More Canon Flash tutorials

Canon USA has an entire section on flash photography with Speedlites. Very interesting articles can be found here.  For example go retro and learn how to take flash photos with the external automatic flash exposure sensor on the Speedlite 580 EX II. Just like my old Braun flash!


29 January 2010

Photo Course: Preparations for the Artis Zoo Shoot

I attended another photo shoot evening. The topics were:

  • Preparations for the Artis Zoo shoot
  • Theory of flash photography
  • Presentation of portrait photographers

Preparations for the Artis Zoo
The entire class will visit the Artis Zoo in Amsterdam. We will try out the various flash techniques explained in this class.

This is the list of things to bring:

  • SLR camera
  • memory cards
  • tripod
  • extra batteries for the camera and flash. Don’t forget to charge them!

I will bring the following stuff:

Theory of flash photography
The teacher gave a short introduction on the theory of flash photography. Things like guide number, how to obtain a correct exposure, relation between guide number and ISO, balancing ambient light and flash light were briefly outlined. Much of the theory can be read on the web pages mentioned in my previous blog post ‘ Flash Technique’.

We will experiment with flash pictures made in the full Auto (P), Tv or Av mode. Full Auto (P) mode tries to expose the subject correctly while maintaining a high shutter speed. The high shutter speed minimizes the risk of a blurry picture but your background can become dark of even black. In Tv or Av mode, the camera tries to obtain a correct exposure for the background and uses the flash to light the subject correctly.

We studied photos made with flash from the following photographers:

Bombay2
Carl de Keyzer

martin-parr
Martin Parr

winston-b1
Ogle Winston Link

Presentation of portrait photographers
A student prepared a short presentation of portrait photographers:


28 January 2010

How to take photos in a snowstorm


Learning from the pros how to take photos during a snow storm with multiple flash strobes.


19 December 2009

Flash Technique

The last evening of the photo course will be dedicated to flash photography. Since there is a lot to read and watch about this topic, I decide to share with you in advance what I have learned.

In the beginning I started with on-camera flash with analog photography (film). The flash is directed straight at the subject. You had to know how far your flash was from the subject. By dividing the guide number (GN) with the distance (in meters) to your subject you ended up with the right aperture value. My photos looked boring with lots of shadows. This was not satisfactory.
Later on I used a Braun 370 BVC flash which contained an onboard flash computer. This gave better results, but flash photography remained a mystery to me.
braun 370bvc front_LR
braun 370bvc back_LR


Fast forward to the digital age with Canon equipment (sorry Nikon users). All the math is not necessary anymore because the camera calculates the right amount of flash output. But still, the flash pictures were not entirely satisfactory.

Thanks to the Internet I have learned a lot from the following people.

Planet Neil
Neil Cowley is a wedding photographer which uses flash light in his photos, without you noticing it. He has been so kind to write an entire tutorial. I liked his articles so much, I even bought and read his book. These articles are a must read to understand flash photography and how to avoid the classic flash picture with shadows and the 'deer in the headlights' look. He taught me to take a photo like this:


Of course your basic metering skills have to be OK. Neil has a tutorial for this.


Strobist
David Hobby takes flash photography to the next level. His Lighting 101 discusses the more technical side of lighting. His proposal is to use small camera flashes (strobes) on light stands instead of the big rigs with lights umbrellas, stands and more. No computer aided exposure, but manual exposure to get more predictable results. I learned from David how to work with colour temperature of daylight, tungsten and flash light. I have not started yet to work with multiple strobes.


Flash photography with Canon EOS Cameras
This is a must read for Canon users who want to know more about the technical side of Canon flash photography. It gives you insight on how the system behaves.

Some other links
Here are some more interesting links explaining the Canon EOS flash system


14 October 2009

Canon flash masterclass

A very good masterclass on flash has been posted on the Canon Professional Network. A must see for Canon flash photographers.


04 October 2009

Now you see flash, then you don't

In my previous posting I wrote about learning how to take better pictures with flash. I also learned some tricks from Neil Cowley how to use flash without anyone noticing it on your photo. His tutorial is a must-read!


070808_350D_IMG_9241


(Yes, flash was fired in this picture :-)


02 October 2009

The Canon Flash Bible

One of the topics in the photo course will be taking a photo with (automatic) flash. A must read for Canon photographers is what I call the Canon Flash Bible.

When you have read all the material on automatic flash, proceed to Strobist to learn all about non-automatic flash!