This interesting video gives you some ideas how to turn a full room of strangers into new friends. How do you behave in a room full of new people?
Enjoy!
31 December 2009
How to Work a Crowd
30 December 2009
Last Minute Tickets for Magritte Museum

Since 2009 a new Magritte Museum has been opened in Brussels. We visited the museum, it gives a good overview of the early years of Magritte.
Purchasing your tickets in advance over the Internet is recommended. The museum is sold out regularly. But if you pass by the museum when tickets are still available, and you want to visit the collection I will share a little secret with you to beat the queues. Go to one of the cloakrooms of the museum and look for touch screen displays with an electronic payment terminal next to it. At the touch screen displays you can see which tickets are still available for that day (only a limited number of people may enter the museum per hour) and purchase them (Visa/Mastercard accepted). Inexplicably the museum does not mention this possibility on its web site. I only found out about this because I asked a French speaking museum assistant if they have an Internet PC somewhere. He directed me to the touch screen displays.
When I visited the museum I saw the touch screen displays at the cloak rooms of the entrance Regentschapsstraat 1 and Koningsplein 1. The last entrance is for individual visitors with tickets. Why you can buy tickets at the cloakroom of this entrance, is a Belgian mystery…
26 December 2009
Handy Calendars for 2010
In preparation for 2010 I want to share two handy calendars with you. These calendars do not require batteries, a PDA or other electronic devices (-:
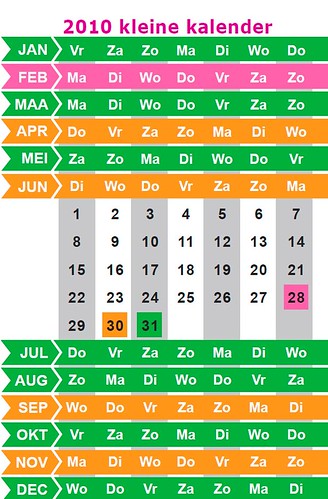
The first calendar is the small calendar. With this handy calendar you can quickly determine on which day (Monday, Tuesday, etc..) a certain date falls. For instance, March 19 is a Friday. Read more about this calendar on Grafish Design’s Blog.

The second calendar is the compact calendar. This calendar is ideal when you want a whole year on one page, so you can quickly see things like “how many days are available, including weekends?” and “when are specific days like holidays?”. Many people use tools like Gantt charts or Microsoft Project. But these tools do not always give a good overview of a year. Read more about the compact calendar on the web site of the designer David Seah.
22 December 2009

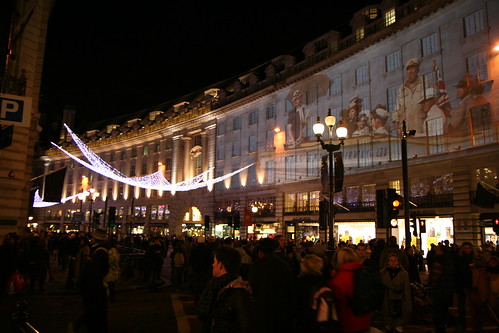
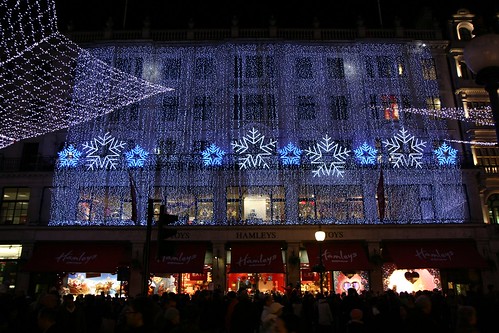
How to Photograph Christmas Lights (Outside)

Photographing holiday lights outside can be very nice because you have the ambient light combined with the electrical light and candles. Strobist has some nice advice on how to get good pictures. The most important advice is to arrive early. Have some sky in the picture to get the wonderful blue colour.
Later in the evening you can still take nice photos, but the sky will be black.

21 December 2009
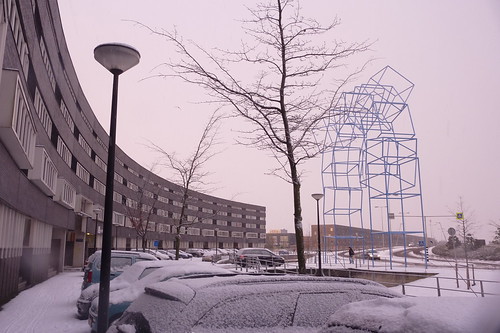
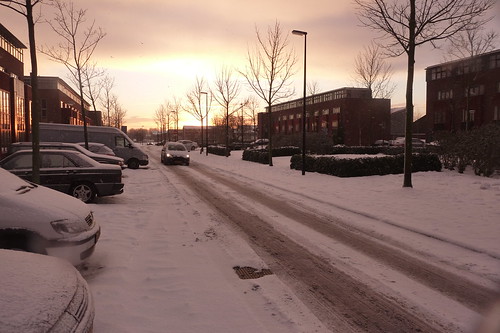
Extreme Snowfall 2009
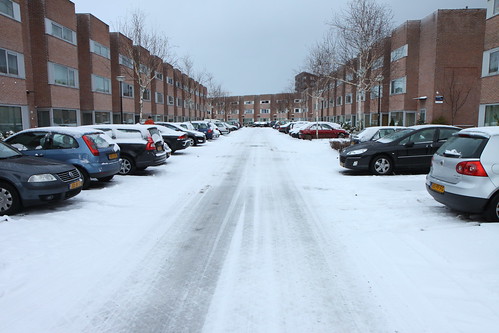
This Sunday was one of the worst days to drive in Holland. On the motorway Amsterdam-Rotterdam it got very bad starting from Leiden. Due to lots of snow and slippery conditions on the highway we drove only 30 km/h and had to keep distance from the other cars. Braking was out of the question. The car started to slip sideways immediately.
The next day the roads were a little better, but public transportation still had lots of trouble.
19 December 2009
Flash Technique
The last evening of the photo course will be dedicated to flash photography. Since there is a lot to read and watch about this topic, I decide to share with you in advance what I have learned.
In the beginning I started with on-camera flash with analog photography (film). The flash is directed straight at the subject. You had to know how far your flash was from the subject. By dividing the guide number (GN) with the distance (in meters) to your subject you ended up with the right aperture value. My photos looked boring with lots of shadows. This was not satisfactory.
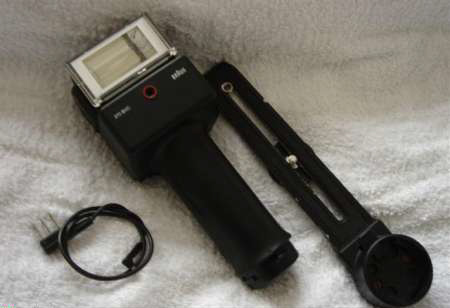
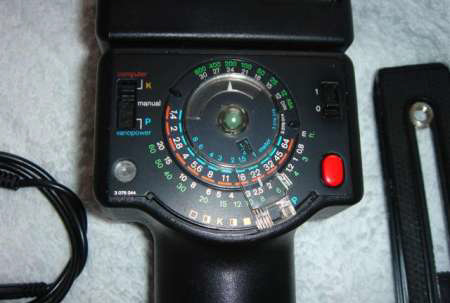
Later on I used a Braun 370 BVC flash which contained an onboard flash computer. This gave better results, but flash photography remained a mystery to me.
Fast forward to the digital age with Canon equipment (sorry Nikon users). All the math is not necessary anymore because the camera calculates the right amount of flash output. But still, the flash pictures were not entirely satisfactory.
Thanks to the Internet I have learned a lot from the following people.
Planet Neil
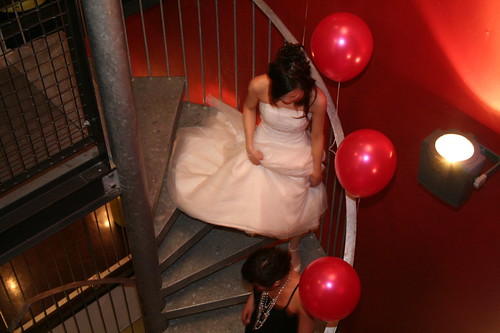
Neil Cowley is a wedding photographer which uses flash light in his photos, without you noticing it. He has been so kind to write an entire tutorial. I liked his articles so much, I even bought and read his book. These articles are a must read to understand flash photography and how to avoid the classic flash picture with shadows and the 'deer in the headlights' look. He taught me to take a photo like this:
Of course your basic metering skills have to be OK. Neil has a tutorial for this.
Strobist
David Hobby takes flash photography to the next level. His Lighting 101 discusses the more technical side of lighting. His proposal is to use small camera flashes (strobes) on light stands instead of the big rigs with lights umbrellas, stands and more. No computer aided exposure, but manual exposure to get more predictable results. I learned from David how to work with colour temperature of daylight, tungsten and flash light. I have not started yet to work with multiple strobes.
Flash photography with Canon EOS Cameras
This is a must read for Canon users who want to know more about the technical side of Canon flash photography. It gives you insight on how the system behaves.
Some other links
Here are some more interesting links explaining the Canon EOS flash system
In the beginning I started with on-camera flash with analog photography (film). The flash is directed straight at the subject. You had to know how far your flash was from the subject. By dividing the guide number (GN) with the distance (in meters) to your subject you ended up with the right aperture value. My photos looked boring with lots of shadows. This was not satisfactory.
Later on I used a Braun 370 BVC flash which contained an onboard flash computer. This gave better results, but flash photography remained a mystery to me.
Fast forward to the digital age with Canon equipment (sorry Nikon users). All the math is not necessary anymore because the camera calculates the right amount of flash output. But still, the flash pictures were not entirely satisfactory.
Thanks to the Internet I have learned a lot from the following people.
Planet Neil
Neil Cowley is a wedding photographer which uses flash light in his photos, without you noticing it. He has been so kind to write an entire tutorial. I liked his articles so much, I even bought and read his book. These articles are a must read to understand flash photography and how to avoid the classic flash picture with shadows and the 'deer in the headlights' look. He taught me to take a photo like this:
Of course your basic metering skills have to be OK. Neil has a tutorial for this.
Strobist
David Hobby takes flash photography to the next level. His Lighting 101 discusses the more technical side of lighting. His proposal is to use small camera flashes (strobes) on light stands instead of the big rigs with lights umbrellas, stands and more. No computer aided exposure, but manual exposure to get more predictable results. I learned from David how to work with colour temperature of daylight, tungsten and flash light. I have not started yet to work with multiple strobes.
Flash photography with Canon EOS Cameras
This is a must read for Canon users who want to know more about the technical side of Canon flash photography. It gives you insight on how the system behaves.
Some other links
Here are some more interesting links explaining the Canon EOS flash system
- Canon Speedlite Tip Series
- Canon EOS Speedlite System Tips
- Canon flash Masterclass
- Speedlites: Expanding the World of Flash Photography
- Flash Photography with Canon EOS Cameras
18 December 2009

Last Photo Course Evening of 2009
I attended the last photo course evening of 2009.
The topics were:
The first photo course evening of the new year will be dedicated to taking portrait photos of various models. We will work in teams consisting of a model, a photographer and an assistant (side note: I think we will have to take a lot of water with us. The models will be lighted with continuous lights which give off a lot of heat, as well as light).
Our teacher gave us some examples of various lighting positions:
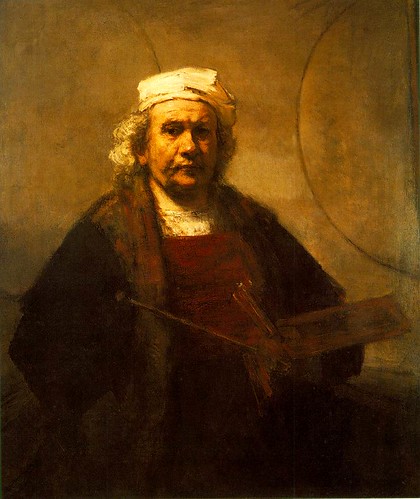
The Rembrandt lighting technique is a very interesting one. As you can see in a lot of Rembrandt paintings, a model can be lit in such a way that a small triangle (of light) appears below one of the eyes.
Various camera positions in relation to the model were discussed. When the camera is higher than the eye level of the model, the model can look more humble / smaller. When the camera position is below eye level, the model can look dominant / more important.
Because this evening coincided with large amounts of snowfall in Holland, quite a few students did not make in time and missed the explanation of the lighting positions. Do not worry about that. The photographer David Ziser has released two excellent video tutorials on this topic.
The first tutorial is called 'Rembrandt Lives - Classical Views of the Face' and explains the various positions of the face in relation to the camera. Scroll down to the end of the blog post to see the video.
The second tutorial is called 'Rembrandt Lives Part 2 - Classical Lighting' and explains how to light the face to add detail and depth.
David uses a lot of wedding photos, since he is a wedding photographer. But his techniques can of course be applied to other situations as well.
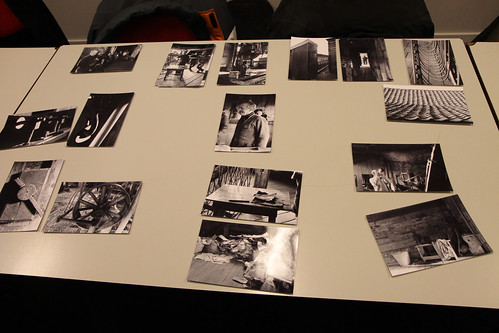
Results of the B&W shooting session at the windmill
It was very interesting to see what photos each student made. Some had abstract photos, others played with light and shadow.
The group made a selection of my photos and grouped them together:
Examples of portrait photography
To give us examples of several portrait photo styles, we took a look at photos from the following photographers:
OK, I am off to take some snow and landscape photos!
The topics were:
- The basics of portrait lighting
- Results of the B&W shooting session at the windmill
- Examples of portrait photography
The first photo course evening of the new year will be dedicated to taking portrait photos of various models. We will work in teams consisting of a model, a photographer and an assistant (side note: I think we will have to take a lot of water with us. The models will be lighted with continuous lights which give off a lot of heat, as well as light).
Our teacher gave us some examples of various lighting positions:
- full face
- 1/3 face (one side of the face lit, the other one in shadows)
- butterfly
- profile
- Rembrandt
The Rembrandt lighting technique is a very interesting one. As you can see in a lot of Rembrandt paintings, a model can be lit in such a way that a small triangle (of light) appears below one of the eyes.
Various camera positions in relation to the model were discussed. When the camera is higher than the eye level of the model, the model can look more humble / smaller. When the camera position is below eye level, the model can look dominant / more important.
Because this evening coincided with large amounts of snowfall in Holland, quite a few students did not make in time and missed the explanation of the lighting positions. Do not worry about that. The photographer David Ziser has released two excellent video tutorials on this topic.
The first tutorial is called 'Rembrandt Lives - Classical Views of the Face' and explains the various positions of the face in relation to the camera. Scroll down to the end of the blog post to see the video.
The second tutorial is called 'Rembrandt Lives Part 2 - Classical Lighting' and explains how to light the face to add detail and depth.
David uses a lot of wedding photos, since he is a wedding photographer. But his techniques can of course be applied to other situations as well.
Results of the B&W shooting session at the windmill
It was very interesting to see what photos each student made. Some had abstract photos, others played with light and shadow.
The group made a selection of my photos and grouped them together:
Examples of portrait photography
To give us examples of several portrait photo styles, we took a look at photos from the following photographers:


OK, I am off to take some snow and landscape photos!
17 December 2009
Camera Settings - Low Light and B&W photography
Here is a description of some things I did during the low light and B&W photo sessions.
We were not allowed to use flash and we did not bring any reflectors with us.
Picture style monochrome, save photo in RAW+JPEG
The camera was set to picture style monochrome and RAW+JPEG format. This way the preview turned up in black and white so you can get a feel how the photo looks like in B&W. When the photo is right the JPEG can be used. Otherwise the RAW file contains all the colour information which can be used to make a good B&W conversion.
Exposure
Obtaining the 'correct' exposure was especially challenging inside the windmil. At first I used the Av setting to make a test photo. Based on the histogram I dialed in some extra exposure time on the subsequent photos. This soon became not practical because the exposure varied depending on the amount of 'bright areas' in the picture. I then realised that I wanted to expose for the skin and to have detail in the shadow parts. So I switched over to M(anual) exposure and set the exposure based on a spot metering of the skin. Some checks during the shooting on the histogram made sure that the highlights were not blown out in critical places.
The advantage of this approach is that the lighting on the photos is much more even than in Av mode.
Use Live View to minimize camera movement
Normally the mirror lockup function is used when you make a photo with a long shutter speed. Unfortunately on a Canon this function is buried somewhere in the menu (Custom Function III-6 on a 50D). So I used the Live View function. This way the mirror is moved up before the actual photo is taken. A Canon 50D has a dedicated button to activate Live View which is much easier than diving into the menus.
Another bonus is that I could see a preview of the photo in B&W on the display.
Use a tripod
Using a tripod makes sure your photos are not blurred by unwanted camera movement.
Look for geometric forms in B&W photos
Because colour is absent in the photo, geometric forms become more pronounced in B&W photos.
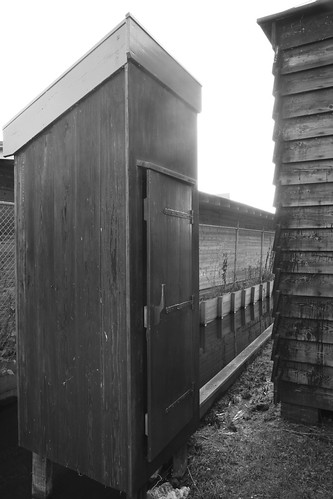
In this photo of the outdoor toilet I experimented with the straight lines of the toilet house.
We were not allowed to use flash and we did not bring any reflectors with us.
Picture style monochrome, save photo in RAW+JPEG
The camera was set to picture style monochrome and RAW+JPEG format. This way the preview turned up in black and white so you can get a feel how the photo looks like in B&W. When the photo is right the JPEG can be used. Otherwise the RAW file contains all the colour information which can be used to make a good B&W conversion.
Exposure
Obtaining the 'correct' exposure was especially challenging inside the windmil. At first I used the Av setting to make a test photo. Based on the histogram I dialed in some extra exposure time on the subsequent photos. This soon became not practical because the exposure varied depending on the amount of 'bright areas' in the picture. I then realised that I wanted to expose for the skin and to have detail in the shadow parts. So I switched over to M(anual) exposure and set the exposure based on a spot metering of the skin. Some checks during the shooting on the histogram made sure that the highlights were not blown out in critical places.
The advantage of this approach is that the lighting on the photos is much more even than in Av mode.
Use Live View to minimize camera movement
Normally the mirror lockup function is used when you make a photo with a long shutter speed. Unfortunately on a Canon this function is buried somewhere in the menu (Custom Function III-6 on a 50D). So I used the Live View function. This way the mirror is moved up before the actual photo is taken. A Canon 50D has a dedicated button to activate Live View which is much easier than diving into the menus.
Another bonus is that I could see a preview of the photo in B&W on the display.
Use a tripod
Using a tripod makes sure your photos are not blurred by unwanted camera movement.
Look for geometric forms in B&W photos
Because colour is absent in the photo, geometric forms become more pronounced in B&W photos.
In this photo of the outdoor toilet I experimented with the straight lines of the toilet house.
14 December 2009
Wiki heeft een winnaar (Wiki has a winner)
On the NAi (Nederlandse Architectuurinstituut) website I found an article about WLANL and my Huis Sonneveld panorama. Nice to know seven other people took the time to go to Huis Sonneveld.
11 December 2009
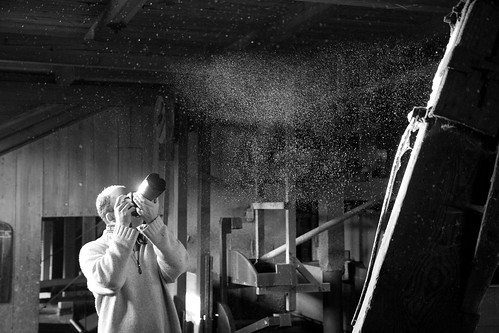
Black and White Photography at Papiermolen de Schoolmeester
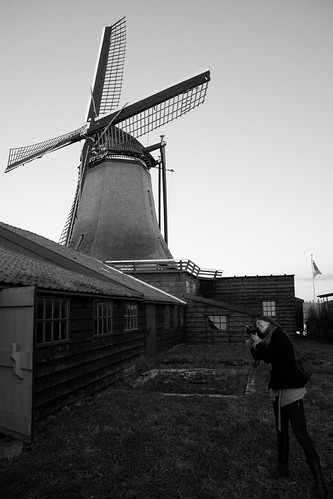
I have visited the Papiermolen (windmill) de Schoolmeester in Westzaan, Holland. Together with other students we got an assignment to make a report on how paper is made in this windmill.
Normally, paper is made from wood. In the old days paper was made from cotton. De Schoolmeester is the oldest (still operating) windmill in the world specialised in making paper from cotton. The facility consists of a windmill and a wooden shed of about 60 meters long.
First the cotton is shred to pieces by hand.

The pieces are put into special containers with water. With wind power the cotton pieces are further broken down into pulp. The pulp is then used to make all sorts of paper. The shed is used to dry the paper.
Taking photos in the windmill proved to be a real challenge. The end result had to be in black and white (I am used to colour photography). During the tour the miller stood most of the time in front of windows, so almost all photos had to be taken in a backlit situation. At first I used Av (Aperture priority) and used exposure compensation to dial in some extra exposure. This soon became too tedious, so I used manual exposure. Exposure was set so you could still see some details in the shadows. The histogram was used to monitor that not too much of the photo was over exposed.
Since this was the first time for me to photograph in black and white I experimented with various geometric shapes.

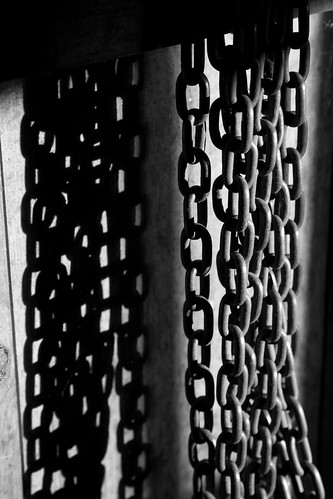
I especially liked to photograph the dust in the windmill.
The entire reportage can be seen here.
07 December 2009
Turning off Google personalization
Google sometimes customizes your search results based on your past search activity on Google. In order to do this Google remembers you previous searches. If you don't like this, follow this guide to turn off personalization:
- If you have a Google Account, remove your web history from the account.
- If you don't have a Google account, a cookie in your browser is used to track your history.
To disable this, perform these steps:
- In the top right corner of the search results page, click Web History.
- On the resulting page, click Disable customizations.(Because this preference is stored in a cookie, it will affect anyone else who uses the same browser and computer as you).
05 December 2009
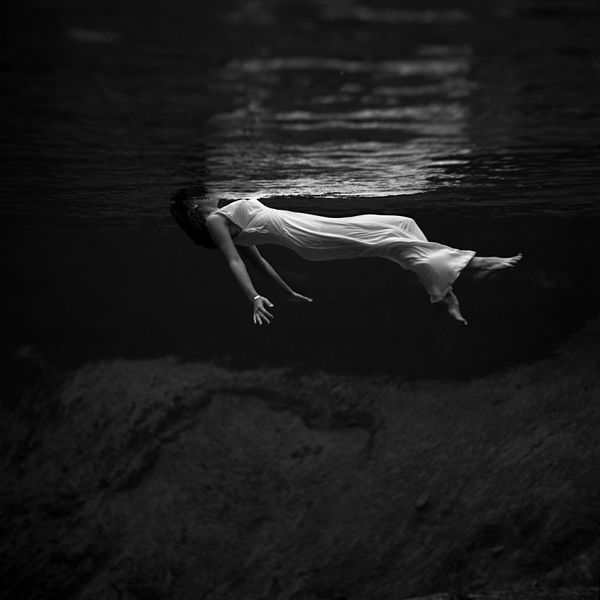
Black and White Tips
I am refreshing my skills on black and white photography by re-reading the following web pages:
- Converting a Digital Color Photo into Back and White
- 5 Black and White Photography Tips
1. Shoot in RAW
2. Shoot in colour, and convert later into black and white
3. Use a low ISO
4. Shoot especially in low contrast situations
5. Composition - look for shapes, tones and textures.
- B & W Photography tips
- Photoshop in black and white
- Create stunning images in Lightroom
- How to Convert Color Digital Images into Black and White Ones
04 December 2009
Fifth Evening at the Photography Course - Contrast and Landscape Photography
This evening the following topics were discussed:
We looked at and discussed landscape photos made by the following photographers:
Landscape photography assignment
Our teacher gave us the next assignment (results must be available in January):
Maak een serie foto's waarbij je de karakteristieke eigenschappen van het landschap gebruikt als verbindend element (create a photo series and use the characteristics of the landscape as a unifying element).
To make it ourselves not too difficult our teacher gave us the advice to pick a landscape in our neighbourhood. The landscape photographers discussed should give us enough inspiration to make our own series.
Results of the evening photography session
The photos of the students were discussed. The effect of different lighting (tungsten, halogen) and color temperature settings could clearly be seen on the different pictures.
Here you get an idea how the photo discussion looks like:
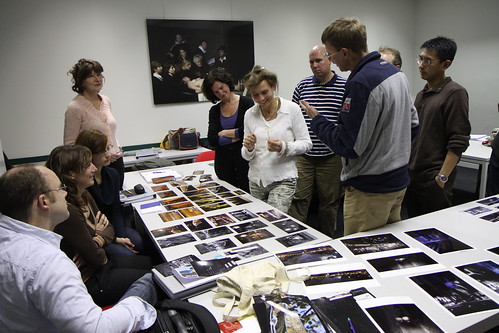
The photo is actually a first. It is the first photo taken of the group during an evening class!
Black and white photography at the Papiermolen
In a few days we will have a photography afternoon session at the Papiermolen.
We have to be prepared:
Our assignments at the Papiermolen are:
Camera settings:
Take an e-mail subscription on this blog so you won't miss the photos!
Black and white conversion in Photoshop
Our teacher gave a quick introduction how black and white conversion can be done in Photoshop. There are several ways to do a black and white conversion:
- Various photos made by landscape photographers
- Landscape photography assignment
- Results of the evening photography session
- Black and white photography at the Papiermolen
- Black and white conversion in Photoshop
We looked at and discussed landscape photos made by the following photographers:
- Franco Fontana
See example 1, example 2, Arps & Co.
- Martin Kers
See example 1.
- Shinzo Maeda
See example 1.
- Ernst Haas
Landscape photography assignment
Our teacher gave us the next assignment (results must be available in January):
Maak een serie foto's waarbij je de karakteristieke eigenschappen van het landschap gebruikt als verbindend element (create a photo series and use the characteristics of the landscape as a unifying element).
To make it ourselves not too difficult our teacher gave us the advice to pick a landscape in our neighbourhood. The landscape photographers discussed should give us enough inspiration to make our own series.
Results of the evening photography session
The photos of the students were discussed. The effect of different lighting (tungsten, halogen) and color temperature settings could clearly be seen on the different pictures.
Here you get an idea how the photo discussion looks like:
The photo is actually a first. It is the first photo taken of the group during an evening class!
Black and white photography at the Papiermolen
In a few days we will have a photography afternoon session at the Papiermolen.
We have to be prepared:
- Bring your tripod.
- Dress warm.
- Wear good shoes. The Papiermolen seems to be very windy and of course there is water in the neighbourhood.
- Bring small change to pay the windmill operator.
Our assignments at the Papiermolen are:
- Take photos which look nice in black and white.
- Take photos with high contrast subjects.
- Take photos with different themes: black/white, light/shadows, texture.
Camera settings:
- JPEG shooters should experiment with the various monochrome settings on the camera.
- RAW shooters can "shoot now", and "worry later about black/white conversion when sitting behind Photoshop".
Take an e-mail subscription on this blog so you won't miss the photos!
Black and white conversion in Photoshop
Our teacher gave a quick introduction how black and white conversion can be done in Photoshop. There are several ways to do a black and white conversion:
- using the Red, Green or Blue channels.
- using the channel mixer with layers
02 December 2009
IT Reference Architectures at Amsterdam Airport Schiphol
IT Reference Architectures at Amsterdam Airport Schiphol
View more presentations from Marc Chang Sing Pang.
In 2008 I was one of the speakers at a Butler Masterclass on Enterprise Architecture. Above you can take a look at the brochure and the presentation.
01 December 2009
Campaign Against Landmines

Subscribe to:
Posts (Atom)