Showing posts with label photo course. Show all posts

18 April 2010

IJburg Night Safari

Night photography was one of the topics of the photography course (see here, here and here). A friend of mine told me Boekhandel van Pampus organized a Night Safari to take photos in a new area of Amsterdam: IJburg. I decided to take part in the night safari. (Nice to know: I used a photo of the bridge connecting IJburg to the main land as a banner for my blog. Click here and here)

The night safari was organized to introduce a new book on IJburg. Louis Stiller and Jabik de Vries wrote “Wachtland - de nachtwaker, de fotograaf en het wordende land”. During the evening and late at night Jabik photographed various locations and wrote about the thoughts he had while waiting for the shutter to close. Jabik visited the island in the first three years of its construction. At that time Louis Stiller wrote about building projects in the Netherlands. They found each other and started this project.

The night safari started at a part in IJburg which is still under construction.


Grotere kaart weergeven

Jabik told us of his experiences while taking the photos. Most of the time you are all alone in the dark. Taking photos in the dark is entirely different from taking photos during daytime. It is quiet, almost no people present, and you cannot always see what will be registered. Also, the camera sees the scene very different than the human eye. Exposure times vary between seconds to several minutes. Camera settings are actually rather simple. The focusing distance is close to infinity. Jabik used aperture settings of about f/5. White balance can be set to Auto. I used the daylight setting to review the photo on screen, and saved the photos in RAW format to make the final decision for white balance later behind the computer. The Canon TC-80N3 Timer Remote Controller proved very useful to set exposure times longer than 30 seconds.

Jabik suggested to to take a photo which included the finished part of the residential area and the part being built. It shows a nice contrast:

Residential Area IJBurg
Residential Area IJburg
Canon 50D | 17-55mm @ 50mm | 35 secs @ f/5.6 | ISO 100

When I was framing the photo I could only see the street lights and the right hand part of the building. The following day I noticed the red traffic post in the lower left corner of the photo. That is the beauty of evening / night photography: you discover a lot of details in your photo later behind your computer.

Car Trails
Car Trails
Canon 50 D | 17-55mm @ 43mm | 148 secs @ f/8 | ISO 100
In the last 20 seconds of the exposure a car passed by and nicely lighted up the lower part of the photo for me.

Jabik suggested to make a photo of the stars in the sky. As there were no planes flying that night (volcano ash, click on this [link]) all the dots and stripes you see in the sky are real stars!

Star Trails
Star Trails
Canon 50D | 17-55mm @ 17mm | 90 secs @ f/4.5 | ISO 200

Of course some passages were read from the book Wachtland.

Reading from the Book Wachtland
Canon 50D | 17-55mm @ 17mm | 2 secs @ f/2.8 | ISO 1600

Some more photos:

Self Portrait
Self Portrait
Canon 50D | 17-55mm @ 17mm | 60 secs @ f/5.0 | ISO 100
Notice the two shadows because I was lighted by two different lamp posts.

Looking into the distance
Canon 50D | 17-55mm @ 17mm | 149 secs @ f/4.5 | ISO 200
At this spot it was pitch dark. I only framed for the horizon and I could just see in the distance that another person was setting up his tripod.
The yellow lights in the lower part of the photos are greenhouses. The white part next to the greenhouses is made by the city of Almere.

A slide show of all the photos:


02 April 2010

The World of Abbot and Atget

Take a look at this documentary of the photographers Eugene Atget and Berenice Abbott. I have seen Atget’s photos in the BBC documentary The Genius of Photography, but I did not know that Berenice Abbot was heavily influenced by him.
The documentary is in English with Dutch subtitles and voice-over. Click here to watch it, or watch it below (requires Silverlight 2.0)
Get Microsoft Silverlight


27 March 2010

BBC Wildlife Photo Masterclasses Online

BBC Wildlife Magazine has put a complete collection of Photo Masterclasses online. Surf to http://www.bbcwildlifemagazine.com/masterclasses.asp and learn how to take better photos of nature!


26 March 2010

Fotocursus deel 4: Reisfotografie

Deel 4 van de AVRO fotocursus gaat over reisfotografie. Klik hier om het te bekijken.


11 March 2010

Last Evening at the Photo Course

Sadly, I attended the last evening of my photo course.

100304-193607_ 0640_50D

The evening started by framing and displaying our most beautiful black and white photos of our visit to the Papiermolen.

100304-191151_ 0630_50D 100304-193059_ 0637_50D 100304-193531_ 0638_50D

The exposition is at Fotogram (http://www.fotogram.nl) zaal 4 from March 2010-May 2010 (give them a call to ask when the room is not used so you can visit the exposition).

We examined the photo albums all the students made from the photos taken for the course. Various album suppliers were used:

Each album had its own characteristics. Hema albums can be ordered in various ways like a booklet or a regular photo album.  We discovered that pages of a Hema album with a certain size (Patricia: how many pages were in your album?) lay flat when opened. The other Hema albums were binded like a book. I will post a review of my photo album ordered at Profotonet at a later date. Blurb albums look like a book and can be ordered by other people (when you say so on the Blurb web site).  Click here for an example of a Blurb photo album.

What have I learned of this course? For me it is: Look less at the technical stuff, have more attention to composition, detail, and the feeling you want to express with the photo. I also learned a lot from grouping the photos, and looking at the work of the other students. Thank you Ariane for teaching us!


Fotocursus deel 2: Beter Zien

Deel 2 van de fotocursus staat nu op de Avro web site.


06 March 2010

Captured by David’s Light

As I have written in a previous post I watched a webinar given by David Ziser. He has put the entire webinar online. Watch the video and see how David discusses Rembrandt lighting, the ‘loop’ technique, ultra wide angle lenses and much more.


02 March 2010

Fotocursus deel 1: Beter Zien

De maand van de fotografie is begonnen!
Bij de Avro kan je nu deel 1 van de fotocursus  bekijken.
Fotocursus deel 1: Beter Zien


21 February 2010

Alexander Rodchenko

My photo class visited the Alexander Rodchenko exposition at Foam. Rodchenko started as a painter and graphic designer. Because he was convinced that photography was the future, he started to take photographs.

I was impressed by his photo montages of his early days. Rodchenko cut out pieces of people or artifacts and put them together to form a new picture. Later, he used unusual perspectives to break free from the usual photos made from the waist level. In 1928 Rodchenko stopped painting and bought a Leica. This small camera enabled him to experiment with unusual viewpoints. Lines going diagonal through the frame play an important role in his photos.


19 February 2010

Maand van de Fotografie - Maart 2010

De maand maart staat bij AVRO Kunst in het teken van foto's, het is dan 'De Maand van de Fotografie'. In samenwerking met het FOAM_Fotografiemuseum Amsterdam en het Nederlands Fotomuseum Rotterdam besteedt kunst.avro.nl volgende maand extra veel aandacht aan fotografie.
Er wordt ook een fotocursus en fotowedstrijd georganiseerd, Kijk op de AVRO Kunst Portal voor meer details.


17 February 2010

Canon Flash Work

2ndcurtain

Canon has an entire web site named ‘Flash Work’  which explains the various possibilities of automatic and manual flash exposure. The most interesting functions are:

The Canon Flash Masterclass web site is more up to date and contains videos which explain the functions even better. See also my previous blog post ‘Flash Technique’.


16 February 2010

Flash - Second Curtain Sync


Photo technical details:
Canon 350D | 17-55mm | 3/10 sec @  f/5.6 | ISO 400
Canon 580 EXII straight on flash in E-TTL II mode.

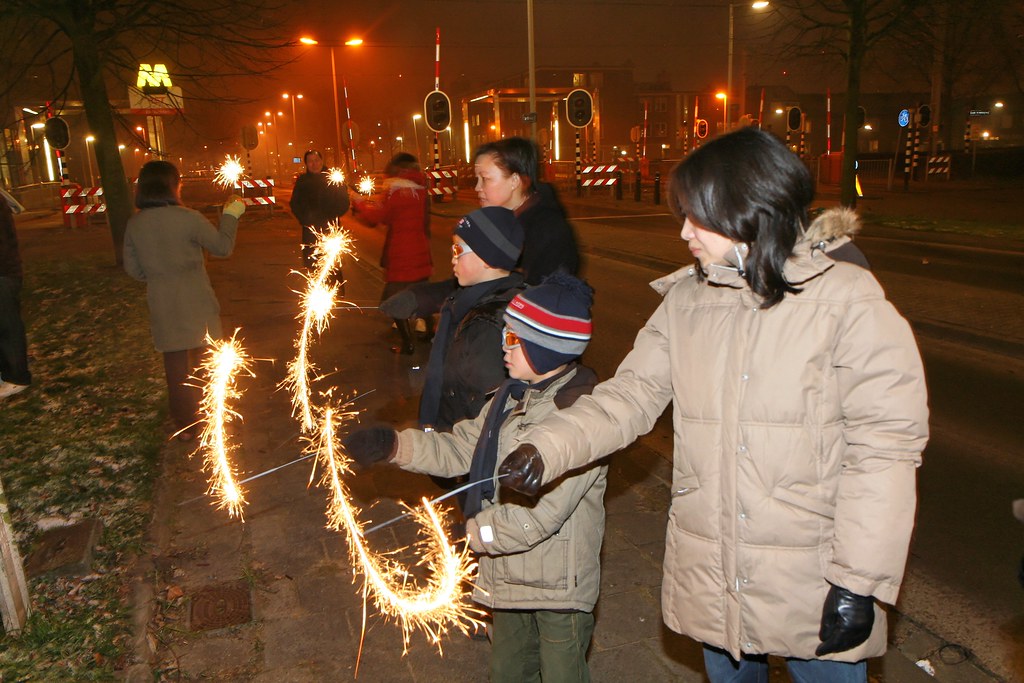
One of the topics of the flash session in our photo course is the effect of synchronizing the flash on the first or second curtain of the camera shutter.  In this blog post I want to illustrate when and why to use second curtain sync.
The photo was shot on New Year’s Eve 2008-2009. I wanted to have the following result:
  • See the trail of the sparklers which were moved up and down.
  • See something of the background. 
    Avoid the ‘people against a black background’ look.
  • Have a ‘natural look’ of the sparkler movement.
In order to get a sparkler trail you need to have a slow shutter speed. With a slow shutter speed the light of the moving sparks is recorded. When you select a shutter speed which is too fast,  you will get no trail at all.
In addition I wanted a ‘natural look’. With that I mean the sparkler sticks should be at the end of the trail,  not the beginning. So I configured the flash to fire just before the shutter closes (second curtain sync or rear curtain sync). This has the following effect:
  • the shutter opens,
  • the movement of the sparkler is recorded,
  • the flash fires so the people  are registered,
  • and the shutter closes.
This way the sparkler is at the end of the movement.

The default setting or first curtain sync would have the following effect:
  • the shutter opens,
  • the flash fires so the people  are registered,
  • the movement of the sparkler is recorded,
  • and the shutter closes.
The sparkler stick would be on the beginning of the spark trail.

So the second curtain sync takes care of having the sparkler in the right position. Now we have to make sure we see something in the background.
I did the following in order to make sure you see the details of the background:
  • put the camera in M(anual) mode.
  • While aiming at the background, set the exposure to 1 stop below the recommended setting of the camera meter.
  • Make sure you have a slow enough shutter speed. In this example I selected 3/10th of a second with an aperture of f/5.6 at ISO 400. Or rather: I selected 3/10 sec. shutter speed and an aperture of f/5.6 and then I adjusted my ISO speed to arrive at the –1 stop exposure for the background.
  • Put the flash exposure on Auto (in this case Canon E-TTL II mode).
These settings have the following effect:
  • The –1 stop exposure ensures you see the street lights in the background of the photo, and that the background is not too bright.
  • The slow shutter speed makes sure you see the movement of the sparklers.
  • With an aperture of f/5.6 the foreground and the background of the photo will be sharp.
  • The automatic flash exposure mode causes the flash to give enough light to illuminate the foreground correctly. I do not have to set the flash output manually.
So that’s how you can do it! While explaining it takes quite a few words, in the real world  I configured my camera within 5 seconds or so. The tricky part is to know what shutter speed, aperture and ISO to choose. I can only say you have to practice a lot and experiment in order to select a good shutter speed. Also you have to learn how to handle your camera and set all the various settings in a dark environment where you do not see all the labels of your buttons!

Remark 1
You should hold your camera very still when shooting the photo because of the low shutter speed. The lens I used is equipped with IS = image stabilization. This means that the lens can compensate for camera shake (within an acceptable range).

Remark 2 
Second curtain sync is called differently by each manufacturer. Canon shooters should look under ‘2nd curtain sync’. Nikon shooters should look under ‘rear curtain sync’. It could be that second curtain sync is not possible with your internal flash. Please check your manual.

Remark 3
It is possible to shoot in Av (Canon) or A (Nikon) mode so you select the aperture of f/5.6 and the camera selects a shutter speed. I do not use this mode because I want to be in full control of the shutter speed as well. When I take the shot and the background looks not right, I only have to adjust the shutter speed to obtain the look I want. In Av or A mode I am at the mercy of the camera when I take my next shot.

Remark 4
The most important thing is to have an interesting subject in the photo. My family loves this photo because they know all the people in it. For you it might be a boring picture (Just admire the sparkler trails then :-)


15 February 2010

Clayton Bozard

clayton01

Copyright © Clayton Bozard

Clayton Bozard was mentioned by our teacher on the photo course as someone who does special things with flash.

It turns out Clayton publishes his work in several ways. He has a blog, a web site, and he even has a Facebook page.

I am curious to see if I can obtain the same effect with small flashes, because Clayton uses some serious lighting to obtain a large and powerful light source:

clayton02

clayton03


13 February 2010

Under (Flash) Attack

Flash Session @ Artis Zoo Amsterdam
At the photo course we learned how to use the flash on our camera. Here you can see a photo I made just before I was blinded by my fellow students. Don’t know anymore what this exercise was about. The photo was taken with a Canon 50D, full Auto with a Canon 580EX II flash.


12 February 2010

Long and Good Glass

Penguins Artis Zoo Amsterdam, Holland

I rented the Canon EF 70-200mm f/2.8 L IS USM Lens for a day at the Artis Zoo, Amsterdam. It is really good glass. The wide aperture of f2.8 really challenges your focusing abilities.

Lions @ Artis Zoo, Amsterdam, Holland

It was rather cold that day so not too much animals could be seen. At least the snow owl didn't mind the weather.

Snow Owl at Artis Zoo, Amsterdam


10 February 2010

Balancing Flash and Ambient Exposure – Where Do You Even Start?

Neil van Niekerk has written a very informative blog entry about balancing flash and ambient exposure. Make sure to read it!

I use the method of under exposing the background by one or two stops.  This is done in M(anual) mode. The foreground or subject is then lit with the flash in TTL mode. Adjustment of the flash exposure is done with flash compensation.


02 February 2010

More Canon Flash tutorials

Canon USA has an entire section on flash photography with Speedlites. Very interesting articles can be found here.  For example go retro and learn how to take flash photos with the external automatic flash exposure sensor on the Speedlite 580 EX II. Just like my old Braun flash!


29 January 2010

Photo Course: Preparations for the Artis Zoo Shoot

I attended another photo shoot evening. The topics were:

  • Preparations for the Artis Zoo shoot
  • Theory of flash photography
  • Presentation of portrait photographers

Preparations for the Artis Zoo
The entire class will visit the Artis Zoo in Amsterdam. We will try out the various flash techniques explained in this class.

This is the list of things to bring:

  • SLR camera
  • memory cards
  • tripod
  • extra batteries for the camera and flash. Don’t forget to charge them!

I will bring the following stuff:

Theory of flash photography
The teacher gave a short introduction on the theory of flash photography. Things like guide number, how to obtain a correct exposure, relation between guide number and ISO, balancing ambient light and flash light were briefly outlined. Much of the theory can be read on the web pages mentioned in my previous blog post ‘ Flash Technique’.

We will experiment with flash pictures made in the full Auto (P), Tv or Av mode. Full Auto (P) mode tries to expose the subject correctly while maintaining a high shutter speed. The high shutter speed minimizes the risk of a blurry picture but your background can become dark of even black. In Tv or Av mode, the camera tries to obtain a correct exposure for the background and uses the flash to light the subject correctly.

We studied photos made with flash from the following photographers:

Bombay2
Carl de Keyzer

martin-parr
Martin Parr

winston-b1
Ogle Winston Link

Presentation of portrait photographers
A student prepared a short presentation of portrait photographers:


23 January 2010

The 30 Most Influential Photographers of The Decade

122010-LARGe_Becker

© Becker

PDN has posted their results of the the 30 most influential photographers of the decade. Ken Rockwell is not on the list, but David Hobby is!